Bernina Bernette 340 deco User Guide - Page 39
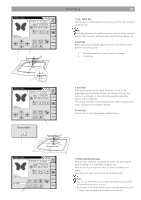
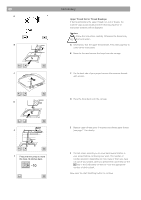
machine will stop automatically when the first is finished.
 |
View all Bernina Bernette 340 deco manuals
Add to My Manuals
Save this manual to your list of manuals |
Page 39 highlights
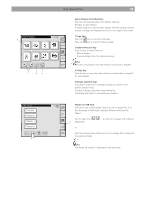
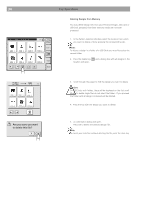
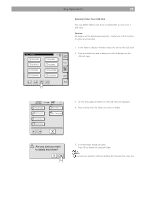
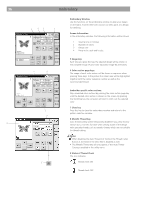
38 Embroidery Starting to Embroider Select the desired pattern. A B 1 The image of the selected pattern will be shown in the embroidery window. Adjust the center lines on your fabric to the needle using the jog keys. See last page for details. Lower the presser foot. Press the start/stop button to start embroidery. The computer will stop automatically after stitching 5 stitches and requests the user to cut the thread tail by showing the instruction window (A) Note: The embroidery computer will not stop if Auto Stop is deactivated in the setup. Raise the presser foot. The screen will show the instruction window (B). Trim the thread tail close to the starting point and lower the presser foot. Press the Start/Stop button to start embroidering again and the machine will stop automatically when the first section is finished. 1 Thread tail 2 Starting point 2 Note: Press the close X key to close the instruction window. This operation is only required, when the stitching process is discontinued. Otherwise the screens will disappear automatically when the presser foot is moved.
-
 1
1 -
2
-
3
-
4
-
5
-
6
-
7
-
8
-
9
-
10
-
11
-
12
-
13
-
14
-
15
-
16
-
17
-
18
-
19
-
20
-
21
-
22
-
23
-
24
-
25
-
26
-
27
-
28
-
29
-
30
-
31
-
32
-
33
-
 34
34 -
 35
35 -
 36
36 -
 37
37 -
 38
38 -
 39
39 -
 40
40 -
 41
41 -
 42
42 -
 43
43 -
 44
44 -
45
-
46
-
47
-
48
-
49
-
50
-
51
-
52
-
53
-
54
-
55
-
56
-
57
-
58
-
59
-
60
-
61
-
62
-
63
-
64
-
65
-
66
-
67
-
68
-
69
-
70
-
71
-
72
-
73
-
74
-
75
 |
 |
