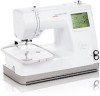
Bernina Bernette 340 deco User Guide - Page 8
Connecting the Power Supply, Operating Instructions, Start/ Stop Button, For Your Safety, Thread - sewing machine
 |
View all Bernina Bernette 340 deco manuals
Add to My Manuals
Save this manual to your list of manuals |
Page 8 highlights
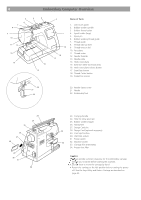
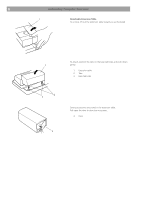
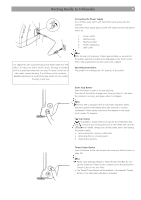
Getting Ready to Embroider 7 1 2 5 3 4 For appliances with a polarized plug (one blade wider than the other): To reduce the risk of electric shock, this plug is intended to fit in a polarized outlet only one way. If it does not fit fully in the outlet, reverse the plug. If it still does not fit, contact a qualified electrician to install the proper outlet. Do not modify the plug in any way. Connecting the Power Supply Turn off the power switch and insert the machine plug into the machine. Insert the power supply plug into the wall outlet and turn the power switch on. 1. Power switch 2. Machine plug 3. Machine socket 4. Power supply plug 5. Wall outlet Note: After turning on the power, it takes approximately six seconds for the pattern selection window to be displayed on the touch screen. (This is the required boot up time and is not a defect) Operating Instructions: The symbol «0» indicates the 'off' position of the switch. Start/ Stop Button Press this button to start or to stop stitching. The color of the button changes each time you press it - red when the machine is running, and green when it is stopped. Note: The Deco 340 is equipped with an automatic shutdown safety feature to prevent overheating when the machine is running overloaded. Follow safety instructions that appear on the visual touch screen if it happens. For Your Safety: While in operation, always keep your eyes on the embroidery area, and do not touch any moving parts such as the thread take-up lever, handwheel or needle. Always turn off the power switch and unplug the power supply: • when leaving the machine unattended. • when attaching or removing parts. • cleaning the machine. Thread Cutter Button Press this button to trim the threads after sewing is finished (refer to page 39). Note: • When using speciality thread or thread thicker than #30 do not use the Automatic Thread Cutter. Instead cut the thread with the Thread Cutter on the Face Plate. • The Thread Cutter Button will be disabled, if the Metallic Thread Button in the Embroidery Window is activated.
-
 1
1 -
2
-
 3
3 -
 4
4 -
 5
5 -
 6
6 -
 7
7 -
 8
8 -
 9
9 -
 10
10 -
 11
11 -
 12
12 -
 13
13 -
14
-
15
-
16
-
17
-
18
-
19
-
20
-
21
-
22
-
23
-
24
-
25
-
26
-
27
-
28
-
29
-
30
-
31
-
32
-
33
-
34
-
35
-
36
-
37
-
38
-
39
-
40
-
41
-
42
-
43
-
44
-
45
-
46
-
47
-
48
-
49
-
50
-
51
-
52
-
53
-
54
-
55
-
56
-
57
-
58
-
59
-
60
-
61
-
62
-
63
-
64
-
65
-
66
-
67
-
68
-
69
-
70
-
71
-
72
-
73
-
74
-
75
 |
 |
