Bernina Bernette 340 deco User Guide - Page 62
Troubleshooting
 |
View all Bernina Bernette 340 deco manuals
Add to My Manuals
Save this manual to your list of manuals |
Page 62 highlights
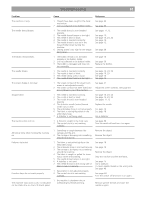
Troubleshooting 61 Problem Cause Reference The machine is noisy. 1 Threads have been caught in the hook mechanism. 2 Lint has collected in the bobbin holder. See page 59 See page 59 The needle thread breaks 1 The needle thread is not threaded properly. 2 The needle thread tension is too tight. 3 The needle is bent or blunt. 4 The needle is inserted incorrectly. 5 The needle thread is not set in the thread holder when starting the machine. 6 Sewing speed is too high for the design being sewn. See pages 11, 12. See page 15. See page 16, 23, 24 See page 16. See page 12. See page 28 The bobbin thread breaks. 1 The bobbin thread is not threaded properly in the bobbin holder. 2 Lint has collected in the bobbin holder. 3 The bobbin is damaged and does not turn smoothly. See page 10 See page 59 Replace the bobbin. The needle breaks. 1 The needle is inserted incorrectly 2 The needle is bent or blunt. 3 The needle clamp screw is loose. 4 The needle thread tension is too tight. See page 16, 23, 24 See page 16, 23 See page 16 See page 15 The screen display is not clear. 1 The screen contrast of the visual touch screen is not adjusted correctly. 2 The screen contrast has been faded due to a continuous use of the machine. See page 27 Adjust the screen contrast. (See page 27) Skipped stitch 1 The needle is inserted incorrectly. 2 The needle is bent or blunt. 3 The needle thread is not threaded properly. 4 The defective needle (rusted, burred needle eye) is used. 5 The embroidery hoop is not set properly. 6 The fabric is not tightly pulled on the embroidery hoop. 7 A stabilizer is not being used. See page 16, 23, 24 See page 16, 23, 24 See pages 11, 12 Replace the needle. See page 19 See page 18 Use a stabilizer. The machine does not run. 1 A thread is caught in the hook race. 2 The control circuit is not working correctly. See page 59 Turn the switch off and turn it on again. Abnormal noise when turning the machine on 1 Something is caught between the carriage and the arm. 2 The carriage is bumping into something around the machine. Remove the object. Remove the object. Patterns distorted Function keys do not work properly. 1 The fabric is not pulled tightly on the embroidery hoop. 2 The embroider hoop is not fixed securely. 3 The carriage is bumping into something around the machine. 4 The fabric is caught or pulled for some reason when embroidering. 5 The needle thread tension is too tight. 6 A stabilizer is not used. 7 The needle thread on the wrong side of fabric is not cut correctly. 1 Key position is not adjusted properly. 2 The control circuit is not working correctly. See page 18 See page 19 Remove the object. Stop the machine and free the fabric. See page 15 Use a stabilizer. Cut extra needle thread on the wrong side. See page 40 See page 28 Turn the switch off and turn it on again. The machine stops and «Lock» is indicated on the status line on the LCD touch panel 1 the machine is shutdown due to overloading by thread jamming. Remove jamme threads and start the machine again.
-
 1
1 -
2
-
3
-
4
-
5
-
6
-
7
-
8
-
9
-
10
-
11
-
12
-
13
-
14
-
15
-
16
-
17
-
18
-
19
-
20
-
21
-
22
-
23
-
24
-
25
-
26
-
27
-
28
-
29
-
30
-
31
-
32
-
33
-
34
-
35
-
36
-
37
-
38
-
39
-
40
-
41
-
42
-
43
-
44
-
45
-
46
-
47
-
48
-
49
-
50
-
51
-
52
-
53
-
54
-
55
-
56
-
 57
57 -
 58
58 -
 59
59 -
 60
60 -
 61
61 -
 62
62 -
 63
63 -
 64
64 -
 65
65 -
 66
66 -
 67
67 -
68
-
69
-
70
-
71
-
72
-
73
-
74
-
75
 |
 |
