Bernina Bernette 340 deco User Guide - Page 40
threading. Press Close
 |
View all Bernina Bernette 340 deco manuals
Add to My Manuals
Save this manual to your list of manuals |
Page 40 highlights
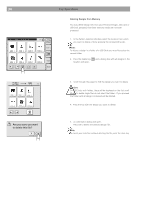
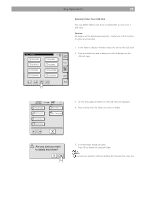
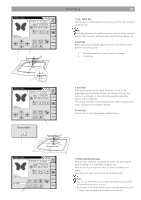
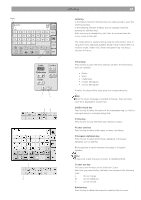
C D # 02260 # 04095 Embroidery 39 After finishing the first section, the screen will show the instruction window (C). Raise the presser foot. The screen will show the instruction window (D). • If Auto Thread Cutter is set to ON, the machine has trimmed the threads automatically. • If Auto Thread Cutter is set to OFF, trim the threads with scissors or by pressing the Thread Cutter button Note: Instruction window (D) closes automatically after a few seconds in order to give you free sight to the new colour to be used for threading. Press Close X , to speed up this process. Change the thread to the next color. Lower the presser foot and press the start/stop button to stitch the second color section. Press the Carriage to Front key after finishing the last section to return the carriage to the unload position. 1. Carriage to Front key Note: Be sure to return the carriage to the unload or idle position before turning the power switch off. Use the keys Utility and Return Carriage as described on page 25. 1
-
 1
1 -
2
-
3
-
4
-
5
-
6
-
7
-
8
-
9
-
10
-
11
-
12
-
13
-
14
-
15
-
16
-
17
-
18
-
19
-
20
-
21
-
22
-
23
-
24
-
25
-
26
-
27
-
28
-
29
-
30
-
31
-
32
-
33
-
34
-
 35
35 -
 36
36 -
 37
37 -
 38
38 -
 39
39 -
 40
40 -
 41
41 -
 42
42 -
 43
43 -
 44
44 -
 45
45 -
46
-
47
-
48
-
49
-
50
-
51
-
52
-
53
-
54
-
55
-
56
-
57
-
58
-
59
-
60
-
61
-
62
-
63
-
64
-
65
-
66
-
67
-
68
-
69
-
70
-
71
-
72
-
73
-
74
-
75
 |
 |
