Bosch HBL8753UC Use and Care Manual - Page 13
Basic Features
 |
View all Bosch HBL8753UC manuals
Add to My Manuals
Save this manual to your list of manuals |
Page 13 highlights
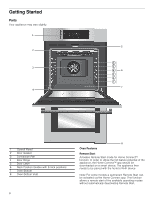
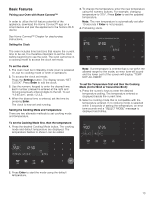
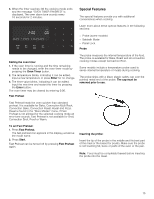
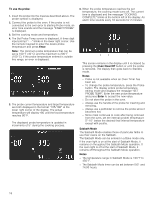
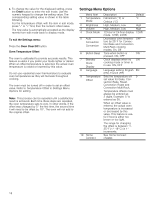
Basic Features Pairing your Oven with Home Connect™ In order to utilize the full feature potential of the appliance, download the Home Connect™ app on a smart device and pair the appliance to the home's Wi-Fi device. See Home Connect™ Chapter for step-by-step instructions. Setting the Clock The oven includes time functions that require the current time to be set. It is therefore important to set the clock before beginning to use the oven. The oven cannot be in a cooking mode to access the clock set mode. To set the clock: 1. The oven must be in Standby mode (oven is powered on, but no cooking mode or timer in operation). 2. To access the clock set mode: Press the Settings button. The display shows "SET CLOCK". Press Enter to edit the clock. 3. Use the numeric keypad to enter the desired time. Each number pressed is entered at the right and moving previously entered digits to the left. To set "12:45 pm", press 1,2,4,5. 4. When the desired time is entered, set the time by pressing Enter. The clock is now set and running. Setting the Cooking Mode and Temperature There are two alternate methods to set cooking mode and temperature. To set the Cooking Mode first, then the temperature: 1. Press the desired Cooking Mode button. The cooking mode and default temperature are displayed. The temperature flashes to show it can be edited. 3. To change the temperature, enter the new temperature using the numeric buttons. For example, changing temperature to 375°. Press Enter to set the updated temperature. Note: The new temperature is automatically set after 10 seconds if Enter is not pressed. 4. Preheating starts. Note: If a temperature is entered that is not within the allowed range for the mode, an error tone will sound and the lower part of the screen will display "TEMP NOT ALLOWED". To set the Temperature first and then the Cooking Mode (not for Broil or Convection Broil): 1. Press the numeric keys to enter the desired temperature setting. The temperature entered is displayed beside the current time. 2. Select a cooking mode that is compatible with the temperature entered. If no cooking mode is selected within 5 seconds of setting the temperature, an error tone sounds and a "SELECT MODE" message is displayed and blinks. 2. Press Enter to start the mode using the default temperature. 13
-
 1
1 -
2
-
3
-
4
-
5
-
6
-
7
-
 8
8 -
 9
9 -
 10
10 -
 11
11 -
 12
12 -
 13
13 -
 14
14 -
 15
15 -
 16
16 -
 17
17 -
 18
18 -
19
-
20
-
21
-
22
-
23
-
24
-
25
-
26
-
27
-
28
-
29
-
30
-
31
-
32
-
33
-
34
-
35
-
36
-
37
-
38
-
39
-
40
-
41
-
42
-
43
-
44
-
45
-
46
-
47
-
48
-
49
-
50
-
51
-
52
-
53
-
54
-
55
-
56
-
57
-
58
-
59
-
60
-
61
-
62
-
63
-
64
-
65
-
66
-
67
-
68
-
69
-
70
-
71
-
72
-
73
-
74
-
75
-
76
 |
 |
