Bosch HBL8753UC Use and Care Manual - Page 33
How to Remove the Oven Door, WARNING, CAUTION
 |
View all Bosch HBL8753UC manuals
Add to My Manuals
Save this manual to your list of manuals |
Page 33 highlights
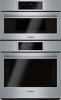
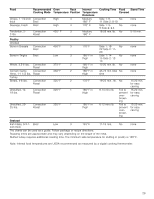
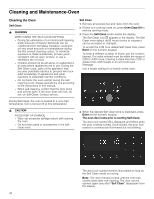
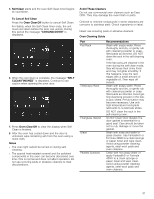
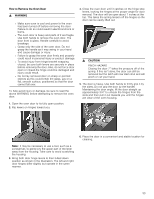
How to Remove the Oven Door 9 WARNING ▯ Make sure oven is cool and power to the oven has been turned off before removing the door. Failure to do so could result in electrical shock or burns. ▯ The oven door is heavy and parts of it are fragile. Use both hands to remove the oven door. The door front is glass. Handle carefully to avoid breakage. ▯ Grasp only the side of the oven door. Do not grasp the handle as it may swing in your hand and cause damage or injury. ▯ Failure to grasp the oven door firmly and properly could result in personal injury or product damage. ▯ To avoid injury from hinge bracket snapping closed, be sure both levers are securely in place before removing the door. Also, do not force door open or closed-the hinge could be damaged and injury could result. ▯ Do not lay removed door on sharp or pointed objects as this could break the glass. Lay on a flat, smooth surface, positioned so that the door cannot fall over. To help avoid injury or damage, be sure to read the above WARNING before attempting to remove the oven door. 1. Open the oven door to its fully open position. 2. Flip levers on hinges toward you. 4. Close the oven door until it catches on the hinge stop levers, locking the hinges at the proper angle for door removal. The door will be open about 7 inches at the top. This takes the spring tension off the hinges so the door can be easily lifted out. 9 CAUTION PINCH HAZARD Closing the door 7" takes the pressure off of the spring. If this isn't done, the door can still be removed but the latch will now slam shut and will pinch or cut your hand. 5. The door is heavy. Use both hands to firmly grip it by the sides. Do not grip the door by the handle. Maintaining the door angle, lift the door straight up approximately 3/4" to unhook the hinges from the slots and then pull it out towards you until the hinges are clear of the oven housing. Note: It may be necessary to use a tool, such as a screwdriver, to gently pry the upper part of the lever away from the housing. Take care to avoid scratching the housing. 3. Bring both door hinge levers to their fullest down position as shown in the illustration. The left and right door hinges differ slightly but operate in the same manner. 6. Place the door in a convenient and stable location for cleaning. 33
-
 1
1 -
2
-
3
-
4
-
5
-
6
-
7
-
8
-
9
-
10
-
11
-
12
-
13
-
14
-
15
-
16
-
17
-
18
-
19
-
20
-
21
-
22
-
23
-
24
-
25
-
26
-
27
-
 28
28 -
 29
29 -
 30
30 -
 31
31 -
 32
32 -
 33
33 -
 34
34 -
 35
35 -
 36
36 -
 37
37 -
 38
38 -
39
-
40
-
41
-
42
-
43
-
44
-
45
-
46
-
47
-
48
-
49
-
50
-
51
-
52
-
53
-
54
-
55
-
56
-
57
-
58
-
59
-
60
-
61
-
62
-
63
-
64
-
65
-
66
-
67
-
68
-
69
-
70
-
71
-
72
-
73
-
74
-
75
-
76
 |
 |