Bowflex Xtreme 2 Assembly Manual - Page 12
Step 12, Attach Front Lat Cross Bar to Upper Lat Tower, Step 13, Attach Rear Lat Cross Bar to Upper
 |
View all Bowflex Xtreme 2 manuals
Add to My Manuals
Save this manual to your list of manuals |
Page 12 highlights
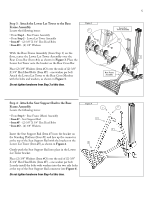
10 Step 12: Attach Front Lat Cross Bar to Upper Lat Tower Locate the following items: • Item #25 - Upper Lat Tower • Item #26 - Front Lat Cross Bar • Item #H - (2) 3/8" X 3" Hex Head Bolts • Item #O - (4) 3/8" Washers • Item #R - (2) 3/8" Nylock Nuts Do not unwrap cables. Align the bolt holes on the Front Lat Cross Bar (Item #26) with the bolt holes on the bracket at the top of the Upper Lat Tower (Item #25). Make sure to face the Cross Bar Hooks toward the front of the Lat Tower. Place (2) 3/8" Washers (Item #O) over the end of (2) 3/8" X 3" Hex Head Bolts (Item #H) - one washer per bolt. Affix the Front Lat Cross Bar to the Upper Lat Tower by screwing the bolts through the aligned bolt holes. Place (2) 3/8" Washers and (2) 3/8" Nylock Nuts (Item #R) over the ends of the bolts to secure them, as shown in Figure 12. Do not tighten hardware from Step 12 at this time. Figure 12 H O 26 Step 13: Attach Rear Lat Cross Bar to Upper Lat Tower Locate the following items: • From Step 12 - Upper Lat Tower Assembly • Item #27 - Rear Lat Cross Bar • Item #J - (2) 1/2" X 5 1/4" Hex Head Bolts • Item #Q - (4) 1/2" Washers, Large OD • Item #S - (2) 1/2" Nylock Nuts Do not unwrap cables. Align the bracket on the Rear Lat Cross Bar (Item #27) with the bolt holes on the Upper Lat Tower - see Figure 13. Place (2) 1/2" Washers, Large OD (Item #Q) over the ends of (2) 1/2" X 5 1/4" Hex Head Bolts (Item #J) - one washer per bolt. Tightly secure the Rear Lat Cross Bar to the Upper Lat Tower by threading the bolts through the aligned bolt holes, and securing the ends with (2) 1/2" Washers, Large OD and (2) 1/2" Nylock Nuts (Item #S), as shown in Figure 13. Tighten all hardware from Steps 12 & 13. When completed, the Upper Lat Tower Assembly should look like the figure 13 inset. Figure 13 S Q 25 25 R 27 Q J
-
 1
1 -
2
-
3
-
4
-
5
-
6
-
 7
7 -
 8
8 -
 9
9 -
 10
10 -
 11
11 -
 12
12 -
 13
13 -
 14
14 -
 15
15 -
 16
16 -
 17
17 -
18
-
19
-
20
-
21
-
22
-
23
 |
 |
