Bowflex Xtreme 2 Assembly Manual - Page 15
Step 17 - Cable & Pulley Routing
 |
View all Bowflex Xtreme 2 manuals
Add to My Manuals
Save this manual to your list of manuals |
Page 15 highlights
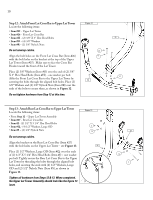
Figure 17- Lat Pulley Housing Towards the Front of the Machine NOTE: Pulleys shown are seperated for clarity. Pulleys do NOT come apart on your machine. 13 Lat Pulley Housing Washer Hex Head Bolt Towards the Rear of the Machine Grasp and hold Cables here Left Pulley Cable Right Pulley Cable Step 17 - Cable & Pulley Routing Prepare Cables to be installed to the Lat Pulley Housing Locate the following items: • (2) Pulleys (already installed, shown labeled as an encircled numeral 2) • (1) 3/8" X 4 1/2" Hex Head Bolt (installed) • (1) 3/8" Washer (already installed) NOTE: Connecting these Cables is much easier with a second person assisting you. 1. Remove the 3/8" X 4 1/2" Hex Head Bolt and 3/8" Washer already installed on the back of the Lat Pulley Housing. Set aside until the end of Step 18. 2. The (2) Pulleys will slide down and out of the housing without the hex bolt holding them in place. 3. Unwrap the Right Pulley Cable on the Right Frame Rail. Thread that cable beneath and then over one (2) Lat Pulley (following the arrows shown in Figure 17), holding the cable tightly where indicated. 4. Repeat with the Left Pulley Cable, without loosening your grip on the Right Pulley Cable.
-
 1
1 -
2
-
3
-
4
-
5
-
6
-
7
-
8
-
9
-
 10
10 -
 11
11 -
 12
12 -
 13
13 -
 14
14 -
 15
15 -
 16
16 -
 17
17 -
 18
18 -
 19
19 -
 20
20 -
21
-
22
-
23
 |
 |
