Bowflex Xtreme 2 Assembly Manual - Page 16
Step 18 - Cable & Pulley Routing - power rods
 |
View all Bowflex Xtreme 2 manuals
Add to My Manuals
Save this manual to your list of manuals |
Page 16 highlights
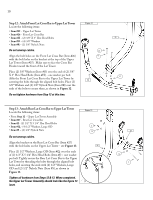
14 Figure 18 - Lat Pulley Housing Referred to as: (2) Pulley Towards the Front of the Machine Lat Pulley Housing Washer Hex Head Bolt Towards the Rear of the Machine Step 18 - Cable & Pulley Routing Connect the Pulleys and Cables to the Lat Pulley Housing Locate the following items: • (2) Pulleys (from Step 17) • (1) 3/8" X 4 1/2" Hex Head Bolt (uninstalled during Step 17) • (1) 3/8" Washer (uninstalled during Step 17) NOTE: Connecting these Cables is much easier with a second person assisting you. 1. While continuing to hold both Cables in place (from Step 17), align both (2) Lat Pulleys as shown in Figure 18. Slide both Pulleys back into the slot in the Lat Pulley Housing, lining up the bolt holes in the Pulleys with the bolt holes in the Lat Pulley Housing. 2. Place the 3/8" Washer over the (1) 3/8" X 4 1/2" Hex Head Bolt that you removed at the start of Step 17, and slide that bolt through the aligned holes in the Lat Pulley Housing and Lat Pulleys, as shown in Figure 18. Tighten all hardware. NOTE: You will most likely need to push the Power Rod® Unit out of the way for this step. They are not pictured for the sake of clarity.
-
 1
1 -
2
-
3
-
4
-
5
-
6
-
7
-
8
-
9
-
10
-
 11
11 -
 12
12 -
 13
13 -
 14
14 -
 15
15 -
 16
16 -
 17
17 -
 18
18 -
 19
19 -
 20
20 -
 21
21 -
22
-
23
 |
 |
