Brother International ADS-2500We Quick Setup Guide - Page 13
Setup using the, DVD-ROM and USB cable
 |
View all Brother International ADS-2500We manuals
Add to My Manuals
Save this manual to your list of manuals |
Page 13 highlights
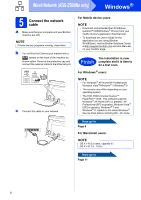
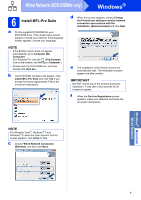
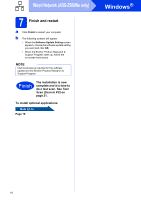
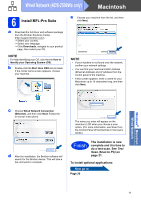
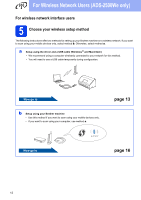
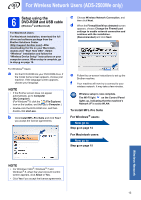
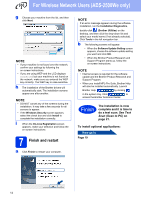
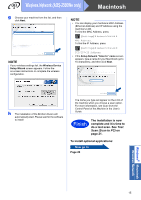
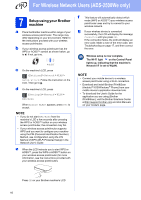
For Wireless Network Users (ADS-2500We only) 6 Setup using the DVD-ROM and USB cable (Windows ® and Macintosh) For Macintosh Users: For Macintosh installation, download the full driver and software package from the Brother Solutions Center (http://support.brother.com/). After downloading the file on your Macintosh, double-click "Start Here OSX". Select "Wireless" installation and follow the "Wireless Device Setup" instructions on your computer screen. When setup is complete, go to step g on page 15. For Windows ® Users: a Put the DVD-ROM into your DVD-ROM drive. If the model name screen appears, choose your machine. If the language screen appears, choose your language. NOTE • If the Brother screen does not appear automatically, go to Computer (My Computer). (For Windows ® 8: click the (File Explorer) icon on the taskbar, and then go to Computer.) • Double-click the DVD-ROM icon, and then double-click start.exe. b Click Install MFL-Pro Suite and click Yes if you accept the license agreements. c Choose Wireless Network Connection, and then click Next. d When the Firewall/AntiVirus detected screen appears, choose Change the Firewall port settings to enable network connection and continue with the installation. (Recommended) and click Next. e Follow the on-screen instructions to set up the Brother machine. f Your machine will now try to connect to your wireless network. It may take a few minutes. Wireless setup is now complete. The Wi-Fi light on the Control Panel lights up, indicating that the machine's Network I/F is set to WLAN. To install MFL-Pro Suite For Windows® users: Now go to Step g on page 14 For Macintosh users: Now go to Step g on page 15 Wireless Network NOTE • For Windows Vista®, Windows ® 7 and Windows ® 8, when the User Account Control screen appears, click Allow or Yes. • Click Yes if you accept the license agreements. 13
-
 1
1 -
2
-
3
-
4
-
5
-
6
-
7
-
 8
8 -
 9
9 -
 10
10 -
 11
11 -
 12
12 -
 13
13 -
 14
14 -
 15
15 -
 16
16 -
 17
17 -
 18
18 -
19
-
20
-
21
-
22
-
23
 |
 |
