Brother International DCP-130C Software & Network Users Manual - English - Page 33
Brightness, Contrast, Document Size, Scan Type, Black & White, True Gray, Resolution, Color Type
 |
UPC - 012502615699
View all Brother International DCP-130C manuals
Add to My Manuals
Save this manual to your list of manuals |
Page 33 highlights
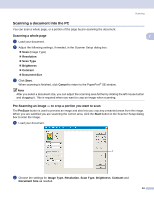
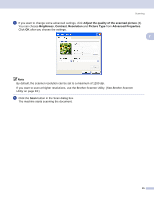
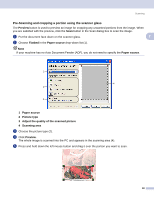
Scanning Brightness 2 Adjust the setting (-50 to 50) to get the best image. The default value is 0, representing an average and is usually suitable for most images. You can set the Brightness level by dragging the slide bar to the right or left to lighten or darken the image. 2 You can also enter a value in the box to set the level. If the scanned image is too light, set a lower Brightness level and scan the document again. If the image is too dark, set a higher Brightness level and scan the document again. Note The Brightness setting is only available when you set Scan Type to Black & White, Gray or True Gray. Contrast 2 You can increase or decrease the contrast level by moving the slide bar to the left or right. An increase emphasizes dark and light areas of the image, while a decrease reveals more detail in gray areas. You can also enter a value in the box to set the Contrast. Note The Contrast setting is only available when you set Scan Type to Gray or True Gray. When scanning photographs or other images for use in a word processor or other graphics application, try different settings for the Resolution, Color Type, Brightness and Contrast to see which setting best suits your needs. Document Size 2 Choose one of the following sizes: „ A4 210 × 297 mm „ JIS B5 182 × 257 mm „ Letter 8 1/2 × 11 in. „ Legal 8 1/2 × 14 in. (Available on ADF models) „ A5 148 × 210 mm „ Executive 7 1/4 × 10 1/2 in. „ Business Card To scan business cards, choose the Business Card size, and then put the business card face down at the center of the scanner glass. „ Photo 4 × 6 in. „ Index Card 5 × 8 in. „ Photo L 89 × 127 mm „ Photo 2L 127 × 178 mm „ Postcard 1 100 × 148 mm „ Postcard 2 148 × 200 mm 27
-
 1
1 -
2
-
3
-
4
-
5
-
6
-
7
-
8
-
9
-
10
-
11
-
12
-
13
-
14
-
15
-
16
-
17
-
18
-
19
-
20
-
21
-
22
-
23
-
24
-
25
-
26
-
27
-
 28
28 -
 29
29 -
 30
30 -
 31
31 -
 32
32 -
 33
33 -
 34
34 -
 35
35 -
 36
36 -
 37
37 -
 38
38 -
39
-
40
-
41
-
42
-
43
-
44
-
45
-
46
-
47
-
48
-
49
-
50
-
51
-
52
-
53
-
54
-
55
-
56
-
57
-
58
-
59
-
60
-
61
-
62
-
63
-
64
-
65
-
66
-
67
-
68
-
69
-
70
-
71
-
72
-
73
-
74
-
75
-
76
-
77
-
78
-
79
-
80
-
81
-
82
-
83
-
84
-
85
-
86
-
87
-
88
-
89
-
90
-
91
-
92
-
93
-
94
-
95
-
96
-
97
-
98
-
99
-
100
-
101
-
102
-
103
-
104
-
105
-
106
-
107
-
108
-
109
-
110
-
111
-
112
-
113
-
114
-
115
-
116
-
117
-
118
-
119
-
120
-
121
-
122
-
123
-
124
-
125
-
126
-
127
-
128
-
129
-
130
-
131
-
132
-
133
-
134
-
135
-
136
-
137
-
138
-
139
-
140
-
141
-
142
-
143
-
144
-
145
-
146
-
147
-
148
-
149
-
150
-
151
-
152
-
153
-
154
-
155
 |
 |
