Brother International HL-2400CEN Users Manual - English - Page 37
Caution, cartridges will be correctly positioned when the front cover is closed.
 |
View all Brother International HL-2400CEN manuals
Add to My Manuals
Save this manual to your list of manuals |
Page 37 highlights
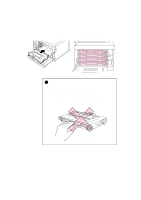
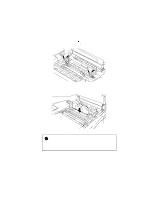
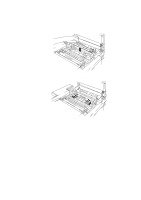
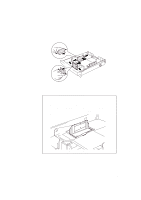
USER'S GUIDE 4. Install the 4 toner cartridges by positioning them in the correct guides. Each color cartridge is individually keyed to prevent improper installation. Match each cartridge color label to the corresponding color label on the printer. Fig. 2-12 Install the Toner Cartridges ! Caution • Insert the toner cartridges gently into the printer. Do not try to lock them into the printer by pushing them all the way into the slot. The cartridges will be correctly positioned when the front cover is closed. • Do not stand the toner cartridge on its end or turn it upside down. • Install the toner cartridges immediately after you remove the protective cover. Do not touch the shaded part shown below. Fig. 2-13 Toner Cartridge 2-8
-
 1
1 -
2
-
3
-
4
-
5
-
6
-
7
-
8
-
9
-
10
-
11
-
12
-
13
-
14
-
15
-
16
-
17
-
18
-
19
-
20
-
21
-
22
-
23
-
24
-
25
-
26
-
27
-
28
-
29
-
30
-
31
-
 32
32 -
 33
33 -
 34
34 -
 35
35 -
 36
36 -
 37
37 -
 38
38 -
 39
39 -
 40
40 -
 41
41 -
 42
42 -
43
-
44
-
45
-
46
-
47
-
48
-
49
-
50
-
51
-
52
-
53
-
54
-
55
-
56
-
57
-
58
-
59
-
60
-
61
-
62
-
63
-
64
-
65
-
66
-
67
-
68
-
69
-
70
-
71
-
72
-
73
-
74
-
75
-
76
-
77
-
78
-
79
-
80
-
81
-
82
-
83
-
84
-
85
-
86
-
87
-
88
-
89
-
90
-
91
-
92
-
93
-
94
-
95
-
96
-
97
-
98
-
99
-
100
-
101
-
102
-
103
-
104
-
105
-
106
-
107
-
108
-
109
-
110
-
111
-
112
-
113
-
114
-
115
-
116
-
117
-
118
-
119
-
120
-
121
-
122
-
123
-
124
-
125
-
126
-
127
-
128
-
129
-
130
-
131
-
132
-
133
-
134
-
135
-
136
-
137
-
138
-
139
-
140
-
141
-
142
-
143
-
144
-
145
-
146
-
147
-
148
-
149
-
150
-
151
-
152
-
153
-
154
-
155
-
156
-
157
-
158
-
159
-
160
-
161
-
162
-
163
-
164
-
165
-
166
-
167
-
168
-
169
-
170
-
171
-
172
-
173
-
174
-
175
-
176
-
177
-
178
-
179
-
180
-
181
-
182
-
183
-
184
-
185
-
186
-
187
-
188
-
189
-
190
-
191
-
192
-
193
-
194
-
195
-
196
-
197
-
198
-
199
-
200
-
201
-
202
-
203
-
204
-
205
-
206
-
207
-
208
-
209
-
210
-
211
-
212
-
213
-
214
-
215
-
216
-
217
-
218
-
219
-
220
-
221
-
222
-
223
-
224
-
225
-
226
-
227
-
228
-
229
-
230
-
231
-
232
-
233
-
234
-
235
-
236
-
237
-
238
-
239
-
240
-
241
-
242
-
243
-
244
-
245
-
246
-
247
-
248
-
249
-
250
-
251
-
252
-
253
-
254
-
255
-
256
 |
 |

USER’S GUIDE
2–8
4.
Install the 4 toner cartridges by positioning them in the correct guides.
Each color cartridge is individually keyed to prevent improper
installation. Match each cartridge color label to the corresponding
color label on the printer.
Fig. 2-12
Install the Toner Cartridges
!
Caution
•
Insert the toner cartridges gently into the printer. Do not try to lock
them into the printer by pushing them all the way into the slot. The
cartridges will be correctly positioned when the front cover is closed.
•
Do not stand the toner cartridge on its end or turn it upside down.
•
Install the toner cartridges immediately after you remove the
protective cover. Do not touch the shaded part shown below.
Fig. 2-13 Toner Cartridge