Brother International HL-3070CW Quick Setup Guide - English - Page 28
Custom Installation, Select Components, PostScript Emulation Driver, Refresh - wireless setup instructions
 |
UPC - 012502622345
View all Brother International HL-3070CW manuals
Add to My Manuals
Save this manual to your list of manuals |
Page 28 highlights
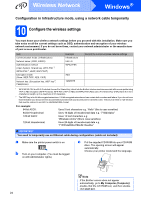
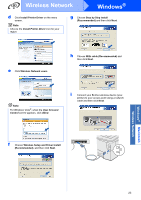
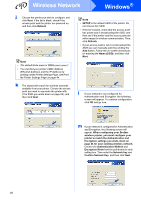
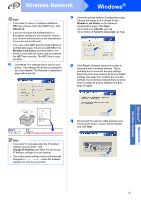
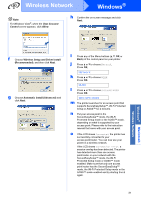
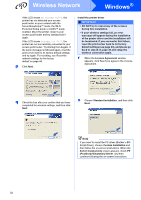
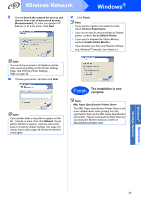
Wireless Network Windows® Install the printer driver IM PORTA NT • DO NOT try to cancel any of the screens during this installation. • If your wireless settings fail, an error message will appear during the installation of the printer driver and the installation will be terminated. If you encounter this failure, reset the print server back to its factory default settings (see page 44), and please go back to step d on page 25 and setup the wireless connection again. r When the License Agreement window appears, click Yes if you agree to the License Agreement. t Choose Search the network for devices and choose from a list of discovered devices (Recommended). Or enter your printer's IP Address or its node name. Click Next. Note You can find your printer's IP Address and the node name by printing out the Printer Settings Page. See Print the Printer Settings Page on page 44. u Choose your printer, and then click Next. s Choose Standard Installation, and then click Next. Note If you want to install the PS driver (Brother's BRScript Driver), choose Custom Installation and then follow the on-screen instructions. When the Select Components screen appears, check PS (PostScript Emulation) Driver, and then continue following the on-screen instructions. Note If your printer takes a long time to appear on the list, 1 minute or more, then click Refresh. If your printer still fails to appear, reset the print server back to its factory default settings (see page 44) and go back to d on page 25 and try the wireless setup again. 28
-
 1
1 -
2
-
3
-
4
-
5
-
6
-
7
-
8
-
9
-
10
-
11
-
12
-
13
-
14
-
15
-
16
-
17
-
18
-
19
-
20
-
21
-
22
-
 23
23 -
 24
24 -
 25
25 -
 26
26 -
 27
27 -
 28
28 -
 29
29 -
 30
30 -
 31
31 -
 32
32 -
 33
33 -
34
-
35
-
36
-
37
-
38
-
39
-
40
-
41
-
42
-
43
-
44
-
45
-
46
-
47
-
48
-
49
-
50
-
51
-
52
-
53
-
54
 |
 |
