Brother International HL-3070CW Quick Setup Guide - English - Page 32
Custom Installation, Select Components, PostScript Emulation Driver
 |
UPC - 012502622345
View all Brother International HL-3070CW manuals
Add to My Manuals
Save this manual to your list of manuals |
Page 32 highlights
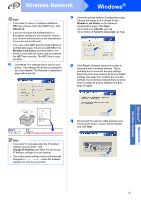
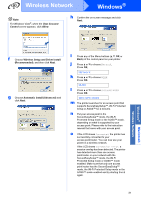
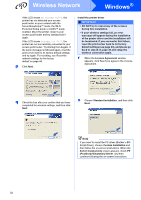
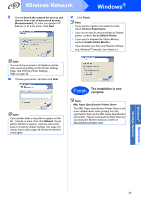
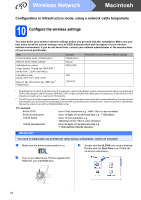
Wireless Network Windows® If the LCD shows No Access Point, the printer has not detected your access point/router on your network with the SecureEasySetup™ mode, the Wi-Fi Protected Setup mode or AOSS™ mode enabled. Move the printer closer to your access point/router and try starting from i again. If the LCD shows Connection Fail, the printer has not successfully connected to your access point/router. Try starting from i again. If the same message is indicated again, reset the print server back to its factory default settings and try again. For resetting, see Reset the network settings to the factory default on page 44. p Click Next. Install the printer driver IM PORTA NT • DO NOT try to cancel any of the screens during this installation. • If your wireless settings fail, an error message will appear during the installation of the printer driver and the installation will be terminated. If you encounter this failure, reset the print server back to its factory default settings (see page 44), and please go back to step d on page 30 and setup the wireless connection again. r When the License Agreement window appears, click Yes if you agree to the License Agreement. q Check the box after you confirm that you have completed the wireless settings, and then click Next. s Choose Standard Installation, and then click Next. Note If you want to install the PS driver (Brother's BRScript Driver), choose Custom Installation and then follow the on-screen instructions. When the Select Components screen appears, check PS (PostScript Emulation) Driver, and then continue following the on-screen instructions. 32
-
 1
1 -
2
-
3
-
4
-
5
-
6
-
7
-
8
-
9
-
10
-
11
-
12
-
13
-
14
-
15
-
16
-
17
-
18
-
19
-
20
-
21
-
22
-
23
-
24
-
25
-
26
-
 27
27 -
 28
28 -
 29
29 -
 30
30 -
 31
31 -
 32
32 -
 33
33 -
 34
34 -
 35
35 -
 36
36 -
 37
37 -
38
-
39
-
40
-
41
-
42
-
43
-
44
-
45
-
46
-
47
-
48
-
49
-
50
-
51
-
52
-
53
-
54
 |
 |
