Brother International RH-981A Instruction Manual - English - Page 14
Installing the motor pulley, 3-4. Installing the control box
 |
View all Brother International RH-981A manuals
Add to My Manuals
Save this manual to your list of manuals |
Page 14 highlights
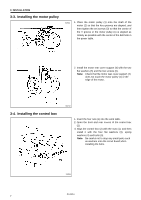
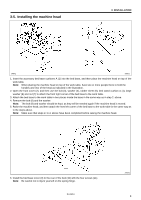
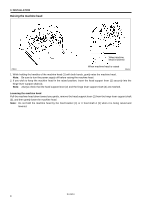
3. INSTALLATION 3-3. Installing the motor pulley 3126Q 1. Place the motor pulley (1) onto the shaft of the motor (2) so that the key grooves are aligned, and then tighten the set screws (3) so that the center of the V groove in the motor pulley (1) is aligned as closely as possible with the center of the belt hole in the power table. 2. Install the motor rear cover support (4) with the two flat washers (5) and the two screws (6). Note: Check that the motor rear cover support (4) does not touch the motor pulley (1) or the edge of the motor. 3-4. Installing the control box 3127Q 1. Insert the four nuts (1) into the work table. 2. Open the front and rear covers of the control box (2). 3. Align the control box (2) with the nuts (1), and then install it with the four flat washers (3), spring washers (4) and bolts (5). Note: Be careful not to drop any small parts such as washers onto the circuit board when installing the bolts. 3128Q RH-981A 7
-
 1
1 -
2
-
3
-
4
-
5
-
6
-
7
-
8
-
 9
9 -
 10
10 -
 11
11 -
 12
12 -
 13
13 -
 14
14 -
 15
15 -
 16
16 -
 17
17 -
 18
18 -
 19
19 -
20
-
21
-
22
-
23
-
24
-
25
-
26
-
27
-
28
-
29
-
30
-
31
-
32
-
33
-
34
-
35
-
36
-
37
-
38
-
39
-
40
-
41
-
42
-
43
-
44
-
45
-
46
-
47
-
48
-
49
-
50
-
51
-
52
-
53
-
54
-
55
-
56
-
57
-
58
-
59
-
60
-
61
-
62
-
63
-
64
-
65
-
66
-
67
-
68
-
69
-
70
-
71
-
72
-
73
-
74
-
75
-
76
-
77
-
78
-
79
-
80
-
81
-
82
-
83
-
84
-
85
-
86
-
87
-
88
-
89
 |
 |
