Brother International RH-981A Instruction Manual - English - Page 20
Connecting the wiring, the control box are complete.
 |
View all Brother International RH-981A manuals
Add to My Manuals
Save this manual to your list of manuals |
Page 20 highlights
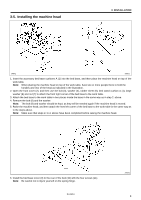
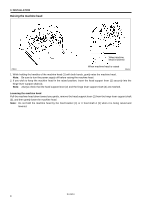
3. INSTALLATION 3-12. Connecting the wiring 2994Q 1. Pass the cable and air tube which are coming out of the belt cover (1) and the machine head (2) through the cable hole (3) in the work table. 2. Pass the cables and air tube which are coming out of the feed bracket (4) and the left side of the bed base (5) and the cable for the hand switch (6) through the cable hole (7) in the work table. Note: Leave enough looseness in the cables so that they will not be pulled when the machine head is tilted back. Adjust the looseness after all connections to the control box are complete. 3130Q 3. Connect the hand switch connector (8) to the control box connector. 4. Install the power switch (9) to the underside of the work table with the two screws (10). 5. Secure the cables using staples (11) (in four locations). 3131Q RH-981A 13
-
 1
1 -
2
-
3
-
4
-
5
-
6
-
7
-
8
-
9
-
10
-
11
-
12
-
13
-
14
-
 15
15 -
 16
16 -
 17
17 -
 18
18 -
 19
19 -
 20
20 -
 21
21 -
 22
22 -
 23
23 -
 24
24 -
 25
25 -
26
-
27
-
28
-
29
-
30
-
31
-
32
-
33
-
34
-
35
-
36
-
37
-
38
-
39
-
40
-
41
-
42
-
43
-
44
-
45
-
46
-
47
-
48
-
49
-
50
-
51
-
52
-
53
-
54
-
55
-
56
-
57
-
58
-
59
-
60
-
61
-
62
-
63
-
64
-
65
-
66
-
67
-
68
-
69
-
70
-
71
-
72
-
73
-
74
-
75
-
76
-
77
-
78
-
79
-
80
-
81
-
82
-
83
-
84
-
85
-
86
-
87
-
88
-
89
 |
 |
