Brother International RH-9820 Basic Instruction Manual - English - Page 15
Installing the control box, Staples [5 pcs.]
 |
View all Brother International RH-9820 manuals
Add to My Manuals
Save this manual to your list of manuals |
Page 15 highlights
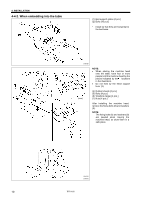
4. INSTALLATION 4-2. Installing the control box CAUTION Before installing the control box, take steps to make sure that the control box does not fall down. If this is not done, injury to feet or damage to the control box may result. 0340B Before installing the control box (1), check that the model plate (2) on the control box (1) is "RX9820" to indicate that it is an RX-control box for RH-9820 sewing machines. (1) Control box (3) Bolts [4 pcs.] (4) Plain washers [4 pcs.] (5) Nuts [8 pcs.] NOTE: Check that the control box (1) is at least 10 mm away from the leg. If the control box (1) and the leg are too close together, it may result in incorrect sewing machine operation. 10mm or more Leg Operator Operator 0404B (6) Power switch (7) Screws [2 pcs.] (8) Staples [5 pcs.] * Use the remaining two staples to secure the power cord (9) in a position that matches the position of the wall outlet. NOTE: Take care when tapping in the staples (8) to make sure that they do not pierce the power cord (9). 0341B RH-9820 7
-
 1
1 -
2
-
3
-
4
-
5
-
6
-
7
-
8
-
9
-
 10
10 -
 11
11 -
 12
12 -
 13
13 -
 14
14 -
 15
15 -
 16
16 -
 17
17 -
 18
18 -
 19
19 -
 20
20 -
21
-
22
-
23
-
24
-
25
-
26
-
27
-
28
-
29
-
30
-
31
-
32
-
33
-
34
-
35
-
36
-
37
-
38
-
39
-
40
-
41
-
42
-
43
-
44
-
45
-
46
-
47
-
48
-
49
-
50
-
51
-
52
-
53
-
54
-
55
-
56
-
57
-
58
-
59
-
60
-
61
-
62
 |
 |
