Brother International RH-9820 Basic Instruction Manual - English - Page 21
Installing the operation panel, 4-9. Installing the cotton stand, operation panel.
 |
View all Brother International RH-9820 manuals
Add to My Manuals
Save this manual to your list of manuals |
Page 21 highlights
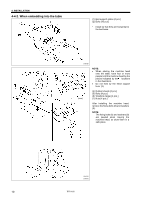
4-8. Installing the operation panel 0355B 4. INSTALLATION (1) Operation panel (2) Screws [4 pcs.] 1. Pass the cord of the operation panel (1) through the table hole. 2. Loosen the two screws (3) at the rear of the control box, open the cord presser plate (4) in the direction of the arrow, and pass the cord through the hole into the box. (Refer to "4-1. Table processing diagram" for details on the installation position for the operation panel.) NOTE: Check that the operation panel cord is not being clamped when screwing the operation panel into the table. The cord may become damaged if it is clamped. 4-9. Installing the cotton stand Operator 0356B Install the cotton stand so that it is at the far left of the table when looking from the front of the sewing machine. * Do not use the thread guide (1) which is provided a an accessory with the cotton stand. (2) Cotton stand (3) Washer (4) Nut NOTE: • Tighten the nut to secure the cotton stand firmly so that it will not move. • The cotton stand can also be installed on the far right side of the table, but if this is done, the threading method will change. (Refer to the instruction manual CD "4-5. Threading the thread when the cotton stand is installed on the right side".) 0357B RH-9820 13
-
 1
1 -
2
-
3
-
4
-
5
-
6
-
7
-
8
-
9
-
10
-
11
-
12
-
13
-
14
-
15
-
 16
16 -
 17
17 -
 18
18 -
 19
19 -
 20
20 -
 21
21 -
 22
22 -
 23
23 -
 24
24 -
 25
25 -
 26
26 -
27
-
28
-
29
-
30
-
31
-
32
-
33
-
34
-
35
-
36
-
37
-
38
-
39
-
40
-
41
-
42
-
43
-
44
-
45
-
46
-
47
-
48
-
49
-
50
-
51
-
52
-
53
-
54
-
55
-
56
-
57
-
58
-
59
-
60
-
61
-
62
 |
 |
