Brother International RH-9820 Basic Instruction Manual - English - Page 19
Tilting back and returning the machine head, To return the machine head from the first step
 |
View all Brother International RH-9820 manuals
Add to My Manuals
Save this manual to your list of manuals |
Page 19 highlights
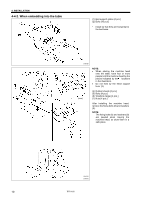
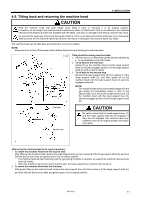
4. INSTALLATION 4-5. Tilting back and returning the machine head CAUTION Hold the machine head with both hands when tilting it back or returning it to its original position. In addition, do not subject the machine head to extra force while it is tilted back. If this is not observed, the machine head may lose balance and fall over (together with the table), and injury or damage to the sewing machine may result. Do not hold the feed base (2) and the feed guide shaft (3). If this is not observed and the feed base (2) or feed guide shaft (3) come off, the machine head may fall down and injury or damage to the machine head may result. The machine head can be tilted back and returned to one of two heights. NOTE: Always be sure to turn off the power switch before tilting back and returning the machine head. 0352B Tilting back the sewing machine head 1. Hold the bed (1) at both sides (at the places indicated by in the illustration) with both hands. 2. To tilt back to the first step: Gently lift up the machine head until the head support lever (4) securely engages section A of the hinge support shaft (5) (until a click is heard). 3. To tilt back to the second step: Remove the head support lever (4) from section A of the hinge support shaft (5), and then gently lift up the machine head until the head support lever (4) securely engages section B. NOTE: The machine head will be momentarily stopped by the gas spring (6) immediately before it rises to the second step, but it will not be locked at this point. Lift the machine head until the head support lever (4) securely engages section B of the hinge support shaft (5). First step CAUTION Be sure to check that the head support lever (4) and the hinge support shaft (5) are engaged. If they are not engaged, the machine head may suddenly return to its original position and injury may result. Second step 1. To return the machine head from the second step: After lifting up the machine head, remove the head support lever (4) from section B of the hinge support shaft (5), and then hold the bed at both sides and gently return it to its original position. * The machine head will start returning until the gas spring (6) starts to operate, so support the machine head securely with both hands. * When the machine head is returned to the first step, the head support lever will lock onto section A. 2. To return the machine head from the first step: After gently lifting up the machine head, remove the head support lever (4) from section A of the hinge support shaft (5), and then hold the bed at both sides and gently return it to its original position. RH-9820 11
-
 1
1 -
2
-
3
-
4
-
5
-
6
-
7
-
8
-
9
-
10
-
11
-
12
-
13
-
 14
14 -
 15
15 -
 16
16 -
 17
17 -
 18
18 -
 19
19 -
 20
20 -
 21
21 -
 22
22 -
 23
23 -
 24
24 -
25
-
26
-
27
-
28
-
29
-
30
-
31
-
32
-
33
-
34
-
35
-
36
-
37
-
38
-
39
-
40
-
41
-
42
-
43
-
44
-
45
-
46
-
47
-
48
-
49
-
50
-
51
-
52
-
53
-
54
-
55
-
56
-
57
-
58
-
59
-
60
-
61
-
62
 |
 |
