Brother International RH-9820 Basic Instruction Manual - English - Page 20
Installing the belt cover and feed bar cover U, 4-7. Installing the oiler, Dust oiler support
 |
View all Brother International RH-9820 manuals
Add to My Manuals
Save this manual to your list of manuals |
Page 20 highlights
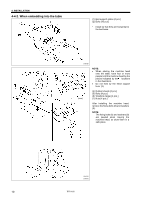
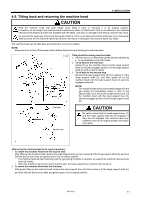
4. INSTALLATION 4-6. Installing the belt cover and feed bar cover U 0351B 0350B (1) Belt cover (2) Screws [4 pcs.] • Before installing the belt cover, pass the cords through the belt cover notch (3). NOTE: • Be careful not to clamp the cords when installing the belt cover. If care is not taken, the belt cover and cords may become damaged. • If using the embedded installation method, check that the belt cover (1) does not touch the table when the machine head is tilted back. (4) Feed bar cover U (5) Screws [2 pcs.] NOTE: If the screws (5) are tightened too much, the feed bar cover U (4) may become cracked. 4-7. Installing the oiler 0619B 0353B The oiler should be installed while the machine head is tilted back. (Refer to "4-5. Tilting back and returning the machine head".) (1) Dust oiler support (2) Screws [2 pcs.] (3) Oiler (4) Oiler spring pin • Use a hammer or similar to tap the pin (4) so that its head is flush with the base of the oil pan (5). NOTE: When tapping in the pin (4), check that the knot in the wick (6) is below the top of the pin (4) as shown in the illustration at left. If the knot is above the pin (4), it may become hit by the hammer and this may cause the wick (6) to break. • Once installation is complete, return the machine head to its original position. 0354B 12 RH-9820
-
 1
1 -
2
-
3
-
4
-
5
-
6
-
7
-
8
-
9
-
10
-
11
-
12
-
13
-
14
-
 15
15 -
 16
16 -
 17
17 -
 18
18 -
 19
19 -
 20
20 -
 21
21 -
 22
22 -
 23
23 -
 24
24 -
 25
25 -
26
-
27
-
28
-
29
-
30
-
31
-
32
-
33
-
34
-
35
-
36
-
37
-
38
-
39
-
40
-
41
-
42
-
43
-
44
-
45
-
46
-
47
-
48
-
49
-
50
-
51
-
52
-
53
-
54
-
55
-
56
-
57
-
58
-
59
-
60
-
61
-
62
 |
 |
