Brother International RH-9820 Basic Instruction Manual - English - Page 22
Installing the air unit and valve unit
 |
View all Brother International RH-9820 manuals
Add to My Manuals
Save this manual to your list of manuals |
Page 22 highlights
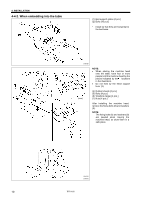
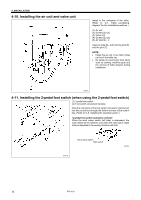
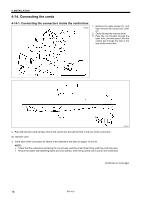
4. INSTALLATION 4-10. Installing the air unit and valve unit Install to the underside of the table. (Refer to "4-1. Table processing diagram" for the installation positions.) (1) Air unit (2) Screws [2 pcs.] (3) Valve unit (4) Screws [2 pcs.] (5) Air tube No. 4 Insert air tube No. 4 (5) into the joint (6) and the joint (7). NOTE: • Install the air unit (1) so that it does not touch the table leg. • Be careful to avoid injury from items such as sewing machine parts and the corners of table drawers during installation. 0358B 4-11. Installing the 2-pedal foot switch (when using the 2-pedal foot switch) (1) 2-pedal foot switch (2) Foot switch conversion harness Pass the connector of the foot switch conversion harness (2) into the control box through the hole in the rear of the control box. (Refer to "4-8. Installing the operation panel".) When the work clamp switch (left side) is depressed, the work clamp will be lowered, and when the start switch (right side) is depressed, the sewing machine will start. Work clamp switch Start switch 0361B 4923Q 14 RH-9820
-
 1
1 -
2
-
3
-
4
-
5
-
6
-
7
-
8
-
9
-
10
-
11
-
12
-
13
-
14
-
15
-
16
-
 17
17 -
 18
18 -
 19
19 -
 20
20 -
 21
21 -
 22
22 -
 23
23 -
 24
24 -
 25
25 -
 26
26 -
 27
27 -
28
-
29
-
30
-
31
-
32
-
33
-
34
-
35
-
36
-
37
-
38
-
39
-
40
-
41
-
42
-
43
-
44
-
45
-
46
-
47
-
48
-
49
-
50
-
51
-
52
-
53
-
54
-
55
-
56
-
57
-
58
-
59
-
60
-
61
-
62
 |
 |
