Brother International RH-9820 Basic Instruction Manual - English - Page 17
Washers [4 pcs.], Rubber sheets [4 pcs.]
 |
View all Brother International RH-9820 manuals
Add to My Manuals
Save this manual to your list of manuals |
Page 17 highlights
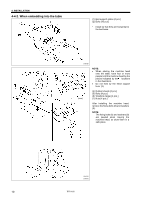
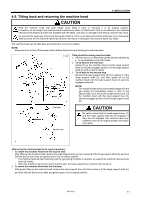
4. INSTALLATION CAUTION Always be sure to install the stopper bolt before tilting back the machine head in step 4 below. If this is not done, the machine head will tip over and fall down, and injury or damage to the machine head may result. 0344B 0345B 0346B (rear) 1. Check that the four bed base cushions (1) have all been installed to the bottom of the bed base, and then place the machine head onto the table. NOTE: • When placing the machine head onto the table, have four or more people hold the machine head by the places indicated by the four locations in the illustration. • Do not hold by the head support lever (2). 2. Use one of the four bolts (3) and a plain washer (4) to provisionally secure the bed base to the table from underneath the table. 3. After provisionally securing the bed base, remove the fixing bolt (5) and washer (6). 4. Tilt back the machine head, and then install the remaining three of the four bolts (3) to the other three places in the bed base. (Refer to "4-5. Tilting back and returning the machine head" for details on tilting back the machine head.) (7) Washers [4 pcs.] (8) Rubber sheets [4 pcs.] (9) Washers (large) [4 pcs.] (10) Nuts [4 pcs.] Provisionally secure NOTE: Do not over tighten the bolts (3) so much that a gap is produced between the table and the bed base. 5. Remove the bolt (3) and washer (4) that were used to provisionally secure the bed base, and install them to the one remaining location. NOTE: The fixing bolts (5) and washers (6) are needed when moving the machine head, so store them in a safe place. gap Provisionally secure RH-9820 9
-
 1
1 -
2
-
3
-
4
-
5
-
6
-
7
-
8
-
9
-
10
-
11
-
 12
12 -
 13
13 -
 14
14 -
 15
15 -
 16
16 -
 17
17 -
 18
18 -
 19
19 -
 20
20 -
 21
21 -
 22
22 -
23
-
24
-
25
-
26
-
27
-
28
-
29
-
30
-
31
-
32
-
33
-
34
-
35
-
36
-
37
-
38
-
39
-
40
-
41
-
42
-
43
-
44
-
45
-
46
-
47
-
48
-
49
-
50
-
51
-
52
-
53
-
54
-
55
-
56
-
57
-
58
-
59
-
60
-
61
-
62
 |
 |
