Brother International RH-9820 Basic Instruction Manual - English - Page 16
Installing the table reinforcement plates (embedded installation only)
 |
View all Brother International RH-9820 manuals
Add to My Manuals
Save this manual to your list of manuals |
Page 16 highlights
4. INSTALLATION 4-3. Installing the table reinforcement plates (embedded installation only) (1) L-shaped reinforcement plates [2 pcs.] (2) Bolts [10 pcs.] (3) Plain washers [10 pcs.] (4) Spring washers [10 pcs.] (5) Nuts [10 pcs.] 0342B 4-4. Installing the machine head 4-4-1. When setting up on top of the table Before installing the machine head, install the three treadle mounting bolts (A) to the table. * Insert the bolts (A) securely so that their heads do not protrude out from the top of the table. (Refer to "4-12. Installing the treadle unit (when using the treadle)".) Table 0343B (Continued on next page) 8 RH-9820
-
 1
1 -
2
-
3
-
4
-
5
-
6
-
7
-
8
-
9
-
10
-
 11
11 -
 12
12 -
 13
13 -
 14
14 -
 15
15 -
 16
16 -
 17
17 -
 18
18 -
 19
19 -
 20
20 -
 21
21 -
22
-
23
-
24
-
25
-
26
-
27
-
28
-
29
-
30
-
31
-
32
-
33
-
34
-
35
-
36
-
37
-
38
-
39
-
40
-
41
-
42
-
43
-
44
-
45
-
46
-
47
-
48
-
49
-
50
-
51
-
52
-
53
-
54
-
55
-
56
-
57
-
58
-
59
-
60
-
61
-
62
 |
 |

4. INSTALLATION
RH-9820
8
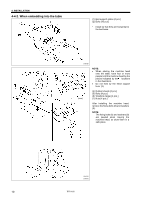
4-3. Installing the table reinforcement plates (embedded installation only)
(1) L-shaped reinforcement plates
[2 pcs.]
(2) Bolts [10 pcs.]
(3) Plain washers [10 pcs.]
(4) Spring washers [10 pcs.]
(5) Nuts [10 pcs.]
4-4. Installing the machine head
4-4-1. When setting up on top of the table
<Only when using the treadle>
Before installing the machine head, install the three treadle
mounting bolts (A) to the table.
* Insert the bolts (A) securely so that their heads do not
protrude out from the top of the table.
(Refer to “4-12. Installing the treadle unit (when using the
treadle)”.)
Table
(Continued on next page)
0342B
0343B