Brother International RH-9820 Basic Instruction Manual - English - Page 31
Connecting the power cord, INSTALLATION, <For single-phase specifications>
 |
View all Brother International RH-9820 manuals
Add to My Manuals
Save this manual to your list of manuals |
Page 31 highlights
4-14-3. Connecting the power cord 4. INSTALLATION Insert the power cord plug (1) into a wall outlet. 1. Attach an appropriate plug to the power cord (2). (The green and yellow wire is the ground wire.) 2. Insert the power plug into a properly-grounded AC power supply. * The inside of the control box uses single-phase power. NOTE: Do not use extension cords. They may cause problems with correct operation of the sewing machine. Green/yellow wire (Ground wire) 0371B RH-9820 23
-
 1
1 -
2
-
3
-
4
-
5
-
6
-
7
-
8
-
9
-
10
-
11
-
12
-
13
-
14
-
15
-
16
-
17
-
18
-
19
-
20
-
21
-
22
-
23
-
24
-
25
-
 26
26 -
 27
27 -
 28
28 -
 29
29 -
 30
30 -
 31
31 -
 32
32 -
 33
33 -
 34
34 -
 35
35 -
 36
36 -
37
-
38
-
39
-
40
-
41
-
42
-
43
-
44
-
45
-
46
-
47
-
48
-
49
-
50
-
51
-
52
-
53
-
54
-
55
-
56
-
57
-
58
-
59
-
60
-
61
-
62
 |
 |

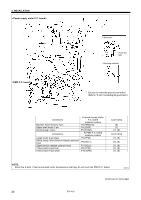
4. INSTALLATION
RH-9820
23
4-14-3. Connecting the power cord
<For single-phase specifications>
Insert the power cord plug (1) into a wall outlet.
<For three-phase specifications>
1. Attach an appropriate plug to the power cord (2). (The
green and yellow wire is the ground wire.)
2.
Insert the power plug into a properly-grounded AC power
supply.
*
The inside of the control box uses single-phase power.
NOTE:
Do not use extension cords. They may cause problems
with correct operation of the sewing machine.
<Single-phase
specifications>
<Three-phase specifications>
Green/yellow wire
(Ground wire)
0371B