Canon EOS 30D EOS 30D Instruction Manual - Page 136
Detail Settings of Printing Effects
 |
UPC - 013803065114
View all Canon EOS 30D manuals
Add to My Manuals
Save this manual to your list of manuals |
Page 136 highlights
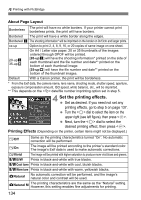
wPrinting with PictBridge [Adjust levels] Turn the dial to select the item to be adjusted, then press . Select [Manual] and press . The Adjust levels screen will then appear. Turn the dial to adjust the shadows (black) within 0 to 127. Press the button. Turn the dial to adjust the highlights (white) within 128 to 255. Press to exit. The previous screen will reappear. When direct printing with DPOF (p.155) is selected, [Manual] can not be selected. [k Brightener] [Red-eye corr.] Turn the dial, select either [Off] or [On], then press . Detail Settings of Printing Effects Select [Detail set.], then press . The Detail set. screen will then appear. Turn the dial to select the item to be adjusted, then press . [Contrast] [Saturation] [Color tone] Turn the dial to adjust the level, then press . 136
-
 1
1 -
2
-
3
-
4
-
5
-
6
-
7
-
8
-
9
-
10
-
11
-
12
-
13
-
14
-
15
-
16
-
17
-
18
-
19
-
20
-
21
-
22
-
23
-
24
-
25
-
26
-
27
-
28
-
29
-
30
-
31
-
32
-
33
-
34
-
35
-
36
-
37
-
38
-
39
-
40
-
41
-
42
-
43
-
44
-
45
-
46
-
47
-
48
-
49
-
50
-
51
-
52
-
53
-
54
-
55
-
56
-
57
-
58
-
59
-
60
-
61
-
62
-
63
-
64
-
65
-
66
-
67
-
68
-
69
-
70
-
71
-
72
-
73
-
74
-
75
-
76
-
77
-
78
-
79
-
80
-
81
-
82
-
83
-
84
-
85
-
86
-
87
-
88
-
89
-
90
-
91
-
92
-
93
-
94
-
95
-
96
-
97
-
98
-
99
-
100
-
101
-
102
-
103
-
104
-
105
-
106
-
107
-
108
-
109
-
110
-
111
-
112
-
113
-
114
-
115
-
116
-
117
-
118
-
119
-
120
-
121
-
122
-
123
-
124
-
125
-
126
-
127
-
128
-
129
-
130
-
 131
131 -
 132
132 -
 133
133 -
 134
134 -
 135
135 -
 136
136 -
 137
137 -
 138
138 -
 139
139 -
 140
140 -
 141
141 -
142
-
143
-
144
-
145
-
146
-
147
-
148
-
149
-
150
-
151
-
152
-
153
-
154
-
155
-
156
-
157
-
158
-
159
-
160
-
161
-
162
-
163
-
164
-
165
-
166
-
167
-
168
-
169
-
170
-
171
-
172
-
173
-
174
-
175
-
176
-
177
-
178
-
179
-
180
-
181
-
182
-
183
-
184
-
185
-
186
-
187
-
188
-
189
-
190
-
191
-
192
-
193
-
194
-
195
-
196
-
197
-
198
-
199
-
200
 |
 |
