Canon EOS 30D EOS 30D Instruction Manual - Page 31
After pressing a button, turn the, > dial., Turn the <, > dial only., Operating the <, > - tips
 |
UPC - 013803065114
View all Canon EOS 30D manuals
Add to My Manuals
Save this manual to your list of manuals |
Page 31 highlights
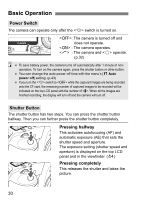
Basic Operation If you press the shutter button halfway and (0) elapse, you must press it halfway again and wait a moment before pressing it completely to take a picture. If you press the shutter button completely without pressing it halfway first or if you press the shutter button halfway and then press it completely immediately, the camera will take a moment before it takes the picture. Ever during image playback, menu display, or image recording, you can press the shutter button halfway to instantly return to shooting. (This does not work during direct printing or while the direct image transfer screen is displayed.) Camera movement during the moment of exposure is called camera shake. Camera shake can cause blurred pictures. To prevent camera shake, note the advice below. Also see "Holding the Camera" (p.44). • Hold the camera steady. • Put your finger tip on the shutter button, hold the camera with your right hand, then press the shutter button gently. Operating the Main Dial The dial is mainly used for shooting-related settings. (1) After pressing a button, turn the dial. When you press a button, its function remains on for 6 seconds (9). While turning the dial, look at the setting in the LCD panel. When the timer ends or if you press the shutter button down halfway, the camera will be ready to shoot. In this way, you can set the AF mode, drive mode, and metering mode and select the AF point. (2) Turn the dial only. While looking at the LCD panel or viewfinder, turn the dial to set the desired setting. In this way, you can set the shutter speed, aperture, etc. 31
-
 1
1 -
2
-
3
-
4
-
5
-
6
-
7
-
8
-
9
-
10
-
11
-
12
-
13
-
14
-
15
-
16
-
17
-
18
-
19
-
20
-
21
-
22
-
23
-
24
-
25
-
 26
26 -
 27
27 -
 28
28 -
 29
29 -
 30
30 -
 31
31 -
 32
32 -
 33
33 -
 34
34 -
 35
35 -
 36
36 -
37
-
38
-
39
-
40
-
41
-
42
-
43
-
44
-
45
-
46
-
47
-
48
-
49
-
50
-
51
-
52
-
53
-
54
-
55
-
56
-
57
-
58
-
59
-
60
-
61
-
62
-
63
-
64
-
65
-
66
-
67
-
68
-
69
-
70
-
71
-
72
-
73
-
74
-
75
-
76
-
77
-
78
-
79
-
80
-
81
-
82
-
83
-
84
-
85
-
86
-
87
-
88
-
89
-
90
-
91
-
92
-
93
-
94
-
95
-
96
-
97
-
98
-
99
-
100
-
101
-
102
-
103
-
104
-
105
-
106
-
107
-
108
-
109
-
110
-
111
-
112
-
113
-
114
-
115
-
116
-
117
-
118
-
119
-
120
-
121
-
122
-
123
-
124
-
125
-
126
-
127
-
128
-
129
-
130
-
131
-
132
-
133
-
134
-
135
-
136
-
137
-
138
-
139
-
140
-
141
-
142
-
143
-
144
-
145
-
146
-
147
-
148
-
149
-
150
-
151
-
152
-
153
-
154
-
155
-
156
-
157
-
158
-
159
-
160
-
161
-
162
-
163
-
164
-
165
-
166
-
167
-
168
-
169
-
170
-
171
-
172
-
173
-
174
-
175
-
176
-
177
-
178
-
179
-
180
-
181
-
182
-
183
-
184
-
185
-
186
-
187
-
188
-
189
-
190
-
191
-
192
-
193
-
194
-
195
-
196
-
197
-
198
-
199
-
200
 |
 |
