Canon EOS 30D EOS 30D Instruction Manual - Page 172
C.Fn-11, Menu button display position, C.Fn-12, Mirror lockup, C.Fn-13, AF point selection method
 |
UPC - 013803065114
View all Canon EOS 30D manuals
Add to My Manuals
Save this manual to your list of manuals |
Page 172 highlights
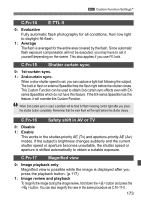
3 Custom Function SettingsN C.Fn-11 Menu button display position When you press the button, you can set the menu screen setting. 0: Previous (top if power off) Displays the preceding menu screen that was used. Note that the top menu screen [Quality] will be displayed instead when the switch is turned . 1: Previous Displays the preceding menu screen that was used. 2: Top Always displays the top menu screen [Quality]. C.Fn-12 Mirror lockup 0: Disable 1: Enable Effective for close-up and telephoto shots to prevent camera shake caused by the mirror's reflex action. See page 98 for the mirror lockup procedure. C.Fn-13 AF point selection method 0: Normal Press the button and use to select the AF point. 1: Multi-controller direct Without pressing the button first, you can just use the to select the desired AF point. Pressing the button will set it to automatic AF point selection. 2: Quick Control Dial direct Without pressing the button first, you can just use the dial to select an AF point directly. By holding down the button and turning the dial, you can set the exposure compensation. 172
-
 1
1 -
2
-
3
-
4
-
5
-
6
-
7
-
8
-
9
-
10
-
11
-
12
-
13
-
14
-
15
-
16
-
17
-
18
-
19
-
20
-
21
-
22
-
23
-
24
-
25
-
26
-
27
-
28
-
29
-
30
-
31
-
32
-
33
-
34
-
35
-
36
-
37
-
38
-
39
-
40
-
41
-
42
-
43
-
44
-
45
-
46
-
47
-
48
-
49
-
50
-
51
-
52
-
53
-
54
-
55
-
56
-
57
-
58
-
59
-
60
-
61
-
62
-
63
-
64
-
65
-
66
-
67
-
68
-
69
-
70
-
71
-
72
-
73
-
74
-
75
-
76
-
77
-
78
-
79
-
80
-
81
-
82
-
83
-
84
-
85
-
86
-
87
-
88
-
89
-
90
-
91
-
92
-
93
-
94
-
95
-
96
-
97
-
98
-
99
-
100
-
101
-
102
-
103
-
104
-
105
-
106
-
107
-
108
-
109
-
110
-
111
-
112
-
113
-
114
-
115
-
116
-
117
-
118
-
119
-
120
-
121
-
122
-
123
-
124
-
125
-
126
-
127
-
128
-
129
-
130
-
131
-
132
-
133
-
134
-
135
-
136
-
137
-
138
-
139
-
140
-
141
-
142
-
143
-
144
-
145
-
146
-
147
-
148
-
149
-
150
-
151
-
152
-
153
-
154
-
155
-
156
-
157
-
158
-
159
-
160
-
161
-
162
-
163
-
164
-
165
-
166
-
 167
167 -
 168
168 -
 169
169 -
 170
170 -
 171
171 -
 172
172 -
 173
173 -
 174
174 -
 175
175 -
 176
176 -
 177
177 -
178
-
179
-
180
-
181
-
182
-
183
-
184
-
185
-
186
-
187
-
188
-
189
-
190
-
191
-
192
-
193
-
194
-
195
-
196
-
197
-
198
-
199
-
200
 |
 |
