Canon EOS C700 User Manual - Page 46
When a B4 lens is attached to the camera using the optional MO-4E or MO-4P B4 Mount Adapter, IMPORTANT
 |
View all Canon EOS C700 manuals
Add to My Manuals
Save this manual to your list of manuals |
Page 46 highlights
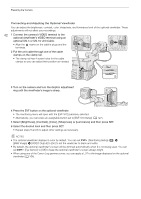
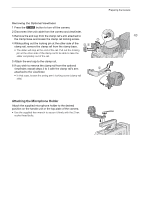
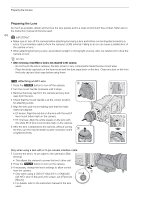
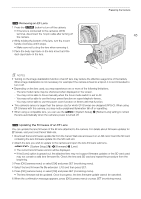
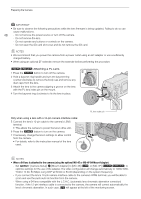
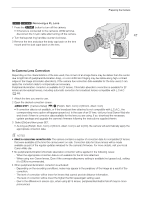
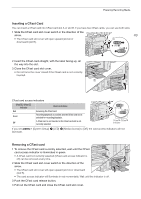
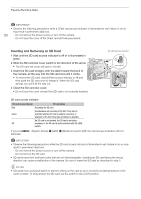
Preparing the Camera IMPORTANT • Be sure to observe the following precautions while the lens firmware is being updated. Failing to do so can cause malfunctions. 46 - Do not remove the power source or turn off the camera. - Do not remove the lens. - Do not operate any buttons or controls on the camera. - Do not open the SD card slot cover and do not remove the SD card. NOTES • We recommend that you power the camera from a power outlet using an AC adapter or use a sufficiently charged battery. • When using an optional EF extender, remove the extender before performing the procedure. [] Attaching a PL Lens 1 Press the Q button to turn off the camera. ባ 2 Hold a bayonet ring handle and turn the bayonet ring counter-clockwise to remove the body cap and remove any dust caps from the lens. 3 Attach the lens to the camera aligning a groove on the lens with the PL lens index pin on the mount. 4 Turn the bayonet ring clockwise to fix the lens in place. ብ ቤ Only when using a lens with a 12-pin camera interface cable: 5 Connect the lens's 12-pin cable to the camera's LENS terminal. • This allows the camera to power the lens's drive unit. 6 Press the Q button to turn on the camera. 7 If necessary, change the lens's settings to allow control from the camera. • For details, refer to the instruction manual of the lens used. PL lens index pin ቦ NOTES • When a B4 lens is attached to the camera (using the optional MO-4E or MO-4P B4 Mount Adapter) - Set [Camera Setup] > [Mount Adapter] to [MO-4E] (Z) or [MO-4P] ([]) to optimize settings for the use of the adapter. The video configuration will change automatically to 1920x1080, YCbCr 10 bit, 50 Mbps Long GOP at 59.94i or 50.00i (depending on the system frequency). - If you connect the lens's 12-pin camera interface cable to the camera's LENS terminal, you will be able to zoom and use the push auto iris function from the camera. - When using a B4 lens compatible with the L.C.A.C. (automatic lens chromatic aberration correction) function, if the 12-pin interface cable is connected to the camera, the camera will correct automatically the lens's chromatic aberration. In such case, will appear at the left of the monitoring screen.
-
 1
1 -
2
-
3
-
4
-
5
-
6
-
7
-
8
-
9
-
10
-
11
-
12
-
13
-
14
-
15
-
16
-
17
-
18
-
19
-
20
-
21
-
22
-
23
-
24
-
25
-
26
-
27
-
28
-
29
-
30
-
31
-
32
-
33
-
34
-
35
-
36
-
37
-
38
-
39
-
40
-
 41
41 -
 42
42 -
 43
43 -
 44
44 -
 45
45 -
 46
46 -
 47
47 -
 48
48 -
 49
49 -
 50
50 -
 51
51 -
52
-
53
-
54
-
55
-
56
-
57
-
58
-
59
-
60
-
61
-
62
-
63
-
64
-
65
-
66
-
67
-
68
-
69
-
70
-
71
-
72
-
73
-
74
-
75
-
76
-
77
-
78
-
79
-
80
-
81
-
82
-
83
-
84
-
85
-
86
-
87
-
88
-
89
-
90
-
91
-
92
-
93
-
94
-
95
-
96
-
97
-
98
-
99
-
100
-
101
-
102
-
103
-
104
-
105
-
106
-
107
-
108
-
109
-
110
-
111
-
112
-
113
-
114
-
115
-
116
-
117
-
118
-
119
-
120
-
121
-
122
-
123
-
124
-
125
-
126
-
127
-
128
-
129
-
130
-
131
-
132
-
133
-
134
-
135
-
136
-
137
-
138
-
139
-
140
-
141
-
142
-
143
-
144
-
145
-
146
-
147
-
148
-
149
-
150
-
151
-
152
-
153
-
154
-
155
-
156
-
157
-
158
-
159
-
160
-
161
-
162
-
163
-
164
-
165
-
166
-
167
-
168
-
169
-
170
-
171
-
172
-
173
-
174
-
175
-
176
-
177
-
178
-
179
-
180
-
181
-
182
-
183
-
184
-
185
-
186
-
187
-
188
-
189
-
190
-
191
-
192
-
193
-
194
-
195
-
196
-
197
-
198
-
199
-
200
-
201
-
202
-
203
-
204
-
205
-
206
-
207
-
208
-
209
-
210
-
211
-
212
-
213
-
214
-
215
-
216
-
217
-
218
-
219
-
220
-
221
-
222
-
223
-
224
-
225
-
226
-
227
-
228
-
229
-
230
-
231
-
232
-
233
-
234
-
235
-
236
-
237
-
238
-
239
-
240
-
241
-
242
-
243
-
244
-
245
-
246
-
247
-
248
-
249
-
250
 |
 |
