Canon LV-X2 Owners Manual - Page 27
Picture Image Adjustment
 |
View all Canon LV-X2 manuals
Add to My Manuals
Save this manual to your list of manuals |
Page 27 highlights
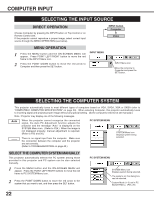
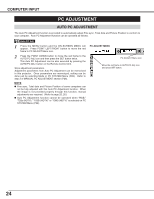
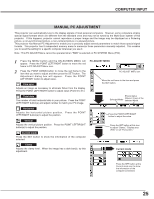
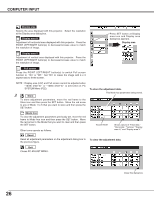
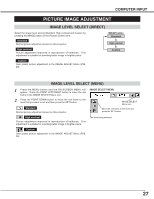
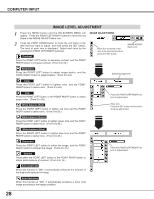
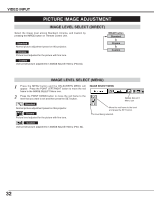
COMPUTER INPUT PICTURE IMAGE ADJUSTMENT IMAGE LEVEL SELECT (DIRECT) Select the image level among Standard, High contrast and Custom by pressing the IMAGE button on the Remote Control Unit. Standard Normal picture adjustment preset on this projector. IMAGE button Standard High contrast High contrast Picture adjustment improved in reproduction of halftones. This adjustment is suitable for providing better image in brighter place. Custom Custom User preset picture adjustment in the IMAGE ADJUST Menu (P28, 29). IMAGE LEVEL SELECT (MENU) 1 Press the MENU button and the ON-SCREEN MENU will appear. Press the POINT LEFT/RIGHT button to move the red frame to the IMAGE SELECT Menu icon. 2 Press the POINT DOWN button to move the red frame to the level that you want to set and then press the SET button. Standard Normal picture adjustment preset on this projector. High contrast Picture adjustment improved in reproduction of halftones. This adjustment is suitable for providing better image in brighter place. IMAGE SELECT MENU IMAGE SELECT Menu icon Move the red frame to the level and press the SET button. The level being selected. Custom User preset picture adjustment in the IMAGE ADJUST Menu (P28, 29). 27
-
 1
1 -
2
-
3
-
4
-
5
-
6
-
7
-
8
-
9
-
10
-
11
-
12
-
13
-
14
-
15
-
16
-
17
-
18
-
19
-
20
-
21
-
 22
22 -
 23
23 -
 24
24 -
 25
25 -
 26
26 -
 27
27 -
 28
28 -
 29
29 -
 30
30 -
 31
31 -
 32
32 -
33
-
34
-
35
-
36
-
37
-
38
-
39
-
40
-
41
-
42
-
43
-
44
 |
 |