Canon PowerShot S100 Software Starter Guide DC SD - Page 13
Installing the USB Driver - elph
 |
View all Canon PowerShot S100 manuals
Add to My Manuals
Save this manual to your list of manuals |
Page 13 highlights
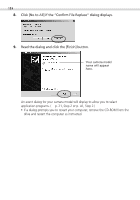
Windows 13 Installing the USB Driver (Preinstalled Windows 98/2000 Systems Only) Notes Regarding Installation • The USB driver only needs to be installed the first time the camera is connected via the USB interface. Installation is not required from the second time onward. • Do not cancel the installation partway through. Allow the procedure to finish completely before exiting. The camera may not operate correctly if the installation is incomplete. • Read the Troubleshooting the Driver Software Installation section on page 44 if the installation cancels itself during the procedure, if the installation does not proceed as described in these procedures, or if you think that the drivers are not properly installed. • Read the "Uninstalling the USB Driver" section on page 44 for instructions for that procedure. Installing the USB Driver into Windows 98 Windows 98 CD-ROM • Your computer may prompt you to insert the CD-ROM containing your Windows system software during the installation. Have the Windows disk handy in case it is required. 1. Once you have attached the USB cable to the camera and computer, set the camera to the mode for communicating with a computer. (§ p. 12) • PowerShot S100 DIGITAL ELPH/DIGITAL IXUS Slide the mode switch to the position and press the main switch to turn on the power. • PowerShot S10/S20 Turn the mode dial to the position. The "Add New Hardware Wizard" dialog will appear after a moment. 2. Read the dialog and click the [Next] button. Your camera model name will appear here. The dialog will change to the search selection dialog.
-
 1
1 -
2
-
3
-
4
-
5
-
6
-
7
-
 8
8 -
 9
9 -
 10
10 -
 11
11 -
 12
12 -
 13
13 -
 14
14 -
 15
15 -
 16
16 -
 17
17 -
 18
18 -
19
-
20
-
21
-
22
-
23
-
24
-
25
-
26
-
27
-
28
-
29
-
30
-
31
-
32
-
33
-
34
-
35
-
36
-
37
-
38
-
39
-
40
-
41
-
42
-
43
-
44
-
45
-
46
-
47
-
48
-
49
-
50
-
51
-
52
-
53
-
54
-
55
-
56
-
57
-
58
-
59
-
60
-
61
-
62
-
63
-
64
-
65
-
66
-
67
-
68
-
69
-
70
-
71
-
72
-
73
-
74
-
75
-
76
-
77
-
78
-
79
-
80
-
81
-
82
-
83
-
84
 |
 |
