Canon PowerShot SD4500 IS PowerShot SD4500 IS / IXUS 1000 HS Camera User Guide - Page 43
Control Dial
 |
View all Canon PowerShot SD4500 IS manuals
Add to My Manuals
Save this manual to your list of manuals |
Page 43 highlights
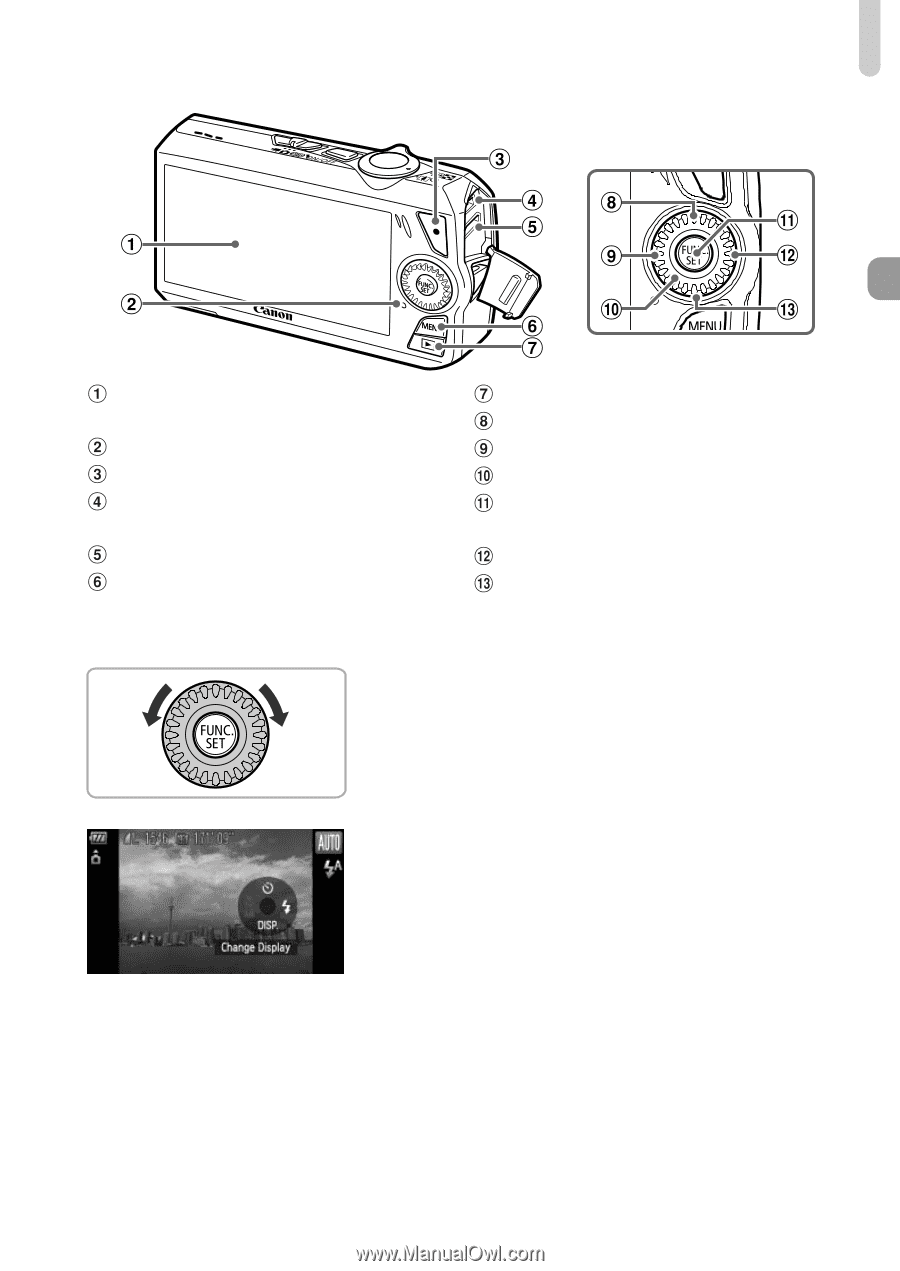
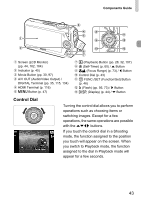
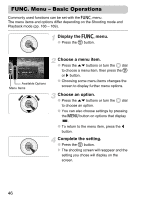
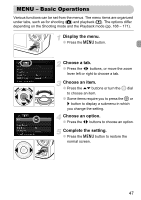
Components Guide Screen (LCD Monitor) (pp. 44, 162, 164) Indicator (p. 45) Movie Button (pp. 30, 97) A/V OUT (Audio/Video Output) / DIGITAL Terminal (pp. 35, 115, 134) HDMI Terminal (p. 116) n Button (p. 47) 1 (Playback) Button (pp. 28, 32, 107) Q (Self-Timer) (p. 60) / o Button eu (Focus Range) (p. 73) / q Button Control Dial (p. 43) m FUNC./SET (Function/Set) Button (p. 46) h (Flash) (pp. 56, 73) / r Button l (Display) (p. 44) / p Button Control Dial Turning the control dial allows you to perform operations such as choosing items or switching images. Except for a few operations, the same operations are possible with the opqr buttons. If you touch the control dial in a Shooting mode, the function assigned to the position you touch will appear on the screen. When you switch to Playback mode, the function assigned to the dial in Playback mode will appear for a few seconds. 43
-
 1
1 -
2
-
3
-
4
-
5
-
6
-
7
-
8
-
9
-
10
-
11
-
12
-
13
-
14
-
15
-
16
-
17
-
18
-
19
-
20
-
21
-
22
-
23
-
24
-
25
-
26
-
27
-
28
-
29
-
30
-
31
-
32
-
33
-
34
-
35
-
36
-
37
-
 38
38 -
 39
39 -
 40
40 -
 41
41 -
 42
42 -
 43
43 -
 44
44 -
 45
45 -
 46
46 -
 47
47 -
 48
48 -
49
-
50
-
51
-
52
-
53
-
54
-
55
-
56
-
57
-
58
-
59
-
60
-
61
-
62
-
63
-
64
-
65
-
66
-
67
-
68
-
69
-
70
-
71
-
72
-
73
-
74
-
75
-
76
-
77
-
78
-
79
-
80
-
81
-
82
-
83
-
84
-
85
-
86
-
87
-
88
-
89
-
90
-
91
-
92
-
93
-
94
-
95
-
96
-
97
-
98
-
99
-
100
-
101
-
102
-
103
-
104
-
105
-
106
-
107
-
108
-
109
-
110
-
111
-
112
-
113
-
114
-
115
-
116
-
117
-
118
-
119
-
120
-
121
-
122
-
123
-
124
-
125
-
126
-
127
-
128
-
129
-
130
-
131
-
132
-
133
-
134
-
135
-
136
-
137
-
138
-
139
-
140
-
141
-
142
-
143
-
144
-
145
-
146
-
147
-
148
-
149
-
150
-
151
-
152
-
153
-
154
-
155
-
156
-
157
-
158
-
159
-
160
-
161
-
162
-
163
-
164
-
165
-
166
-
167
-
168
-
169
-
170
-
171
-
172
-
173
-
174
-
175
-
176
-
177
-
178
-
179
-
180
 |
 |