Canon PowerShot SD4500 IS PowerShot SD4500 IS / IXUS 1000 HS Camera User Guide - Page 6
Table of Contents - digital
 |
View all Canon PowerShot SD4500 IS manuals
Add to My Manuals
Save this manual to your list of manuals |
Page 6 highlights
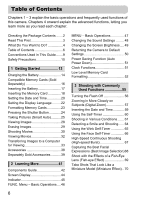
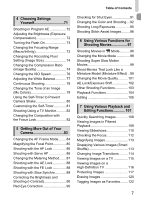
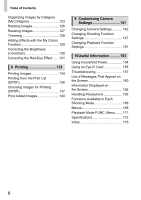
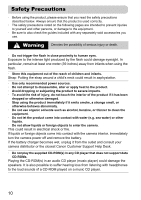
Table of Contents Chapters 1 - 3 explain the basic operations and frequently used functions of this camera. Chapters 4 onward explain the advanced functions, letting you learn more as you read each chapter. Checking the Package Contents .......2 Read This First 3 What Do You Want to Do 4 Table of Contents 6 Conventions Used in This Guide .......9 Safety Precautions 10 1 Getting Started 13 Charging the Battery 14 Compatible Memory Cards (Sold Separately 16 Inserting the Battery 17 Inserting the Memory Card 18 Setting the Date and Time 20 Setting the Display Language..........22 Formatting Memory Cards 23 Pressing the Shutter Button 24 Taking Pictures (Smart Auto)...........25 Viewing Images 28 Erasing Images 29 Shooting Movies 30 Viewing Movies 32 Transferring Images to a Computer for Viewing 33 Accessories 38 Separately Sold Accessories ...........39 2 Learning More 41 Components Guide 42 Screen Display 44 Indicator 45 FUNC. Menu - Basic Operations ....46 6 MENU - Basic Operations 47 Changing the Sound Settings ......... 48 Changing the Screen Brightness .... 49 Returning the Camera to Default Settings 50 Power Saving Function (Auto Power Down 51 Clock Functions 51 Low Level Memory Card Formatting 52 3 Shooting with Commonly Used Functions 55 Turning the Flash Off 56 Zooming in More Closely on Subjects (Digital Zoom 57 Inserting the Date and Time 59 Using the Self-Timer 60 Shooting in Various Conditions ....... 61 Detecting a Smile and Shooting...... 64 Using the Wink Self-Timer 65 Using the Face Self-Timer 66 High-Speed Continuous Shooting (High-speed Burst 67 Capturing the Best Facial Expressions (Best Image Selection)68 Shoot with the Effects of a Fish-Eye Lens (Fish-eye Effect 69 Take Shots That Look Like a Miniature Model (Miniature Effect) .. 70
-
 1
1 -
 2
2 -
 3
3 -
 4
4 -
 5
5 -
 6
6 -
 7
7 -
 8
8 -
 9
9 -
 10
10 -
 11
11 -
 12
12 -
13
-
14
-
15
-
16
-
17
-
18
-
19
-
20
-
21
-
22
-
23
-
24
-
25
-
26
-
27
-
28
-
29
-
30
-
31
-
32
-
33
-
34
-
35
-
36
-
37
-
38
-
39
-
40
-
41
-
42
-
43
-
44
-
45
-
46
-
47
-
48
-
49
-
50
-
51
-
52
-
53
-
54
-
55
-
56
-
57
-
58
-
59
-
60
-
61
-
62
-
63
-
64
-
65
-
66
-
67
-
68
-
69
-
70
-
71
-
72
-
73
-
74
-
75
-
76
-
77
-
78
-
79
-
80
-
81
-
82
-
83
-
84
-
85
-
86
-
87
-
88
-
89
-
90
-
91
-
92
-
93
-
94
-
95
-
96
-
97
-
98
-
99
-
100
-
101
-
102
-
103
-
104
-
105
-
106
-
107
-
108
-
109
-
110
-
111
-
112
-
113
-
114
-
115
-
116
-
117
-
118
-
119
-
120
-
121
-
122
-
123
-
124
-
125
-
126
-
127
-
128
-
129
-
130
-
131
-
132
-
133
-
134
-
135
-
136
-
137
-
138
-
139
-
140
-
141
-
142
-
143
-
144
-
145
-
146
-
147
-
148
-
149
-
150
-
151
-
152
-
153
-
154
-
155
-
156
-
157
-
158
-
159
-
160
-
161
-
162
-
163
-
164
-
165
-
166
-
167
-
168
-
169
-
170
-
171
-
172
-
173
-
174
-
175
-
176
-
177
-
178
-
179
-
180
 |
 |