Canon Pro90 PowerShot Pro90IS Camera User Guide - Page 127
Problem, Cause, Solution
 |
UPC - 082966162275
View all Canon Pro90 manuals
Add to My Manuals
Save this manual to your list of manuals |
Page 127 highlights
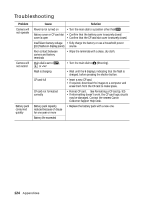
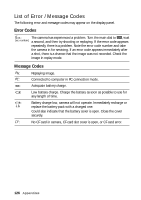
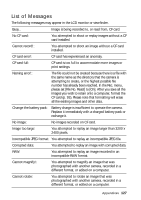
Problem Cause Solution Battery pack Main dial is not turned to • Turn the main dial to . will not charge . Battery life exceeded • Replace the battery pack with a new one. Poor contact between camera and compact power adapter • Plug the compact power adapter's DC plug more firmly into the camera's DC IN terminal. • Connect the power cord to the compact power adapter and insert its plug firmly into the electrical outlet. Image is Camera moved blurred, out of focus, or not as expected Subject out of focal range • Slide the image stabilizer switch on. • Be careful not to move the camera when pressing the shutter button. • Ensure that there is at least 10 cm (3.9 in) between the camera lens and subject at maximum wide angle and at least 1 m (3.3 ft.) at maximum telephoto. Subject is too Insufficient light for dark shooting • Set the built-in flash to on. • Use a high-output externally mounted flash. Subject dark in comparison • Set the exposure compensation to a positive (+) setting. to the background • Use the AE lock or spot metering function. Subject too far for flash to reach • To use the built-in flash, shoot within 70 cm to 4.2 m (2.3 - 13.8 ft.) of the subject at the maximum wide angle and within 1 m to 3.4 m (3.3 - 11.2 ft.) at the maximum telephoto setting. • Use an externally mounted flash with a large output. Subject is too Subject too close bright • If you are using a flash, adjust the flash output with the flash exposure compensation function (p. 65). Subject bright in comparison to the background • Set the exposure compensation to a negative (-) setting. • Use the AE lock or spot metering function. Light shining directly on subject or reflected off subject into camera • Change the shooting angle. Flash set to On • Set the flash to Auto or Off. Flash will not Flash set to Off fire • Set the flash to Auto or On. Image not Incorrect video system showing on TV setting • Set the video system to the appropriate setting, NTSC or PAL, for your TV § (See Set up Menu, p. 104). Zoom does not Mode dial is turned to operate or . • Turn the mode dial to any shooting mode except for or . Appendices 125
-
 1
1 -
2
-
3
-
4
-
5
-
6
-
7
-
8
-
9
-
10
-
11
-
12
-
13
-
14
-
15
-
16
-
17
-
18
-
19
-
20
-
21
-
22
-
23
-
24
-
25
-
26
-
27
-
28
-
29
-
30
-
31
-
32
-
33
-
34
-
35
-
36
-
37
-
38
-
39
-
40
-
41
-
42
-
43
-
44
-
45
-
46
-
47
-
48
-
49
-
50
-
51
-
52
-
53
-
54
-
55
-
56
-
57
-
58
-
59
-
60
-
61
-
62
-
63
-
64
-
65
-
66
-
67
-
68
-
69
-
70
-
71
-
72
-
73
-
74
-
75
-
76
-
77
-
78
-
79
-
80
-
81
-
82
-
83
-
84
-
85
-
86
-
87
-
88
-
89
-
90
-
91
-
92
-
93
-
94
-
95
-
96
-
97
-
98
-
99
-
100
-
101
-
102
-
103
-
104
-
105
-
106
-
107
-
108
-
109
-
110
-
111
-
112
-
113
-
114
-
115
-
116
-
117
-
118
-
119
-
120
-
121
-
 122
122 -
 123
123 -
 124
124 -
 125
125 -
 126
126 -
 127
127 -
 128
128 -
 129
129 -
 130
130 -
 131
131 -
 132
132 -
133
-
134
-
135
-
136
-
137
-
138
-
139
-
140
 |
 |
