Canon S820 S820 Quick Start Guide - Page 45
To load Photo Paper Pro for Borderless Printing 4 x 6, To print with borderless paper for Windows
 |
View all Canon S820 manuals
Add to My Manuals
Save this manual to your list of manuals |
Page 45 highlights
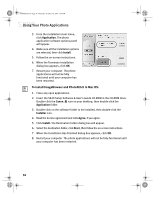
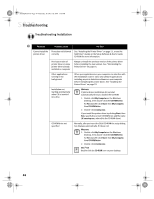
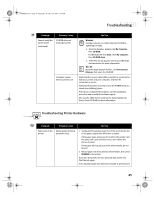
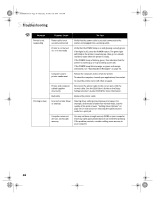
S820QSG.book Page 41 Thursday, October 18, 2001 1:41 PM Using Your Photo Applications To load Photo Paper Pro for Borderless Printing 4" x 6": 1. Set the paper thickness lever to the left. Paper thickness lever 2. Slide the paper guide completely to the left. 3. With the glossy side facing up, place a sheet on top of the Loading Support Sheet provided with your Canon Photo Paper Pro for Borderless Printing 4" x 6" media. 4. Align the edges of both sheets. 5. Align the media with the right side of the sheet feeder, then insert both the loading support sheet and the borderless paper into the paper rest, with the print side of the borderless paper on top and facing up. 6. Slide the paper guide right to the edge of the stack. You can load up to 20 sheets of Canon Photo Paper Pro for Borderless Printing 4" x 6" at a time, with the loading support sheet at the bottom of the stack. Make sure the loading support sheet is pointing in the direction of the arrow. To avoid paper jams, never load a sheet that is curled or bent, and make sure the edges of the card and the loading support sheet are aligned before setting them in the paper rest. To print with borderless paper for Windows: 1. Follow the procedures above to load the borderless paper. 2. From ZoomBrowser EX, select the photo to be printed. 3. Click Print, then click Layout. The PhotoRecord Print Modes wizard will appear. 4. Select the desired printer, then select Borderless Printing (Tiled photo) from the Print Mode options. The Borderless Printing (Tiled photo) check box is available only when you are using a printer which supports this feature. 41
-
 1
1 -
2
-
3
-
4
-
5
-
6
-
7
-
8
-
9
-
10
-
11
-
12
-
13
-
14
-
15
-
16
-
17
-
18
-
19
-
20
-
21
-
22
-
23
-
24
-
25
-
26
-
27
-
28
-
29
-
30
-
31
-
32
-
33
-
34
-
35
-
36
-
37
-
38
-
39
-
 40
40 -
 41
41 -
 42
42 -
 43
43 -
 44
44 -
 45
45 -
 46
46 -
 47
47 -
 48
48 -
 49
49 -
 50
50 -
51
-
52
-
53
-
54
-
55
-
56
-
57
-
58
-
59
-
60
-
61
-
62
-
63
-
64
-
65
-
66
-
67
-
68
-
69
-
70
-
71
-
72
 |
 |
