Canon S820 S820 Quick Start Guide - Page 51
Setup Software & User's Guide CD-ROM for more
 |
View all Canon S820 manuals
Add to My Manuals
Save this manual to your list of manuals |
Page 51 highlights
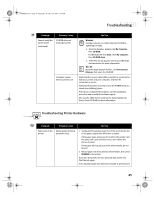
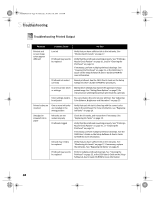
S820QSG.book Page 47 Thursday, October 18, 2001 1:41 PM Troubleshooting Problem Printing is slow (continued) Printer tried to print but no ink on paper Possible Cause Try This Computer resources are low; not enough disk space When a print job is sent to the printer, it first goes to a temporary print spool. If the file is large and you have limited disk space available, this can slow or stop printing. WINDOWS Delete all temporary files (.tmp). If you have Windows 98 or later, you can also run the Disk Cleanup utility: 1. From the Start menu, click Programs, then Accessories, then System Tools, then Disk Cleanup. 2. Select the drive you want to clean, then click OK. 3. Check Temporary Files, then click OK. The files will be deleted. MAC OS If you run out of disk space on your computer, copy any unused files to floppies, a zip disk or other removable media, then delete the files from your hard disk by dragging into the trash. Ink tanks are not seated properly Check the ink tanks, and reseat them if necessary. See "Replacing Ink Tanks" on page 29. Printhead clogged Verify that the printhead is working properly. See "Printing a Nozzle Check Pattern" on page 31, or "Cleaning the Printhead" on page 33. If necessary, perform multiple printhead cleanings. See the S820 User's Guide on the Setup Software & User's Guide CD-ROM for more information. Ink tanks may need to be replaced Verify that you have sufficient ink in the ink tanks. See "Monitoring Ink Levels" on page 27. If necessary, replace the ink tanks. See "Replacing Ink Tanks" on page 29. Printhead may need to be replaced Verify that the printhead is working properly. See "Printing a Nozzle Check Pattern" on page 31, or "Cleaning the Printhead" on page 33. If necessary, perform multiple printhead cleanings. See "Cleaning the Printhead" on page 33, or the S820 User's Guide on the Setup Software & User's Guide CD-ROM for more information. 47
-
 1
1 -
2
-
3
-
4
-
5
-
6
-
7
-
8
-
9
-
10
-
11
-
12
-
13
-
14
-
15
-
16
-
17
-
18
-
19
-
20
-
21
-
22
-
23
-
24
-
25
-
26
-
27
-
28
-
29
-
30
-
31
-
32
-
33
-
34
-
35
-
36
-
37
-
38
-
39
-
40
-
41
-
42
-
43
-
44
-
45
-
 46
46 -
 47
47 -
 48
48 -
 49
49 -
 50
50 -
 51
51 -
 52
52 -
 53
53 -
 54
54 -
 55
55 -
 56
56 -
57
-
58
-
59
-
60
-
61
-
62
-
63
-
64
-
65
-
66
-
67
-
68
-
69
-
70
-
71
-
72
 |
 |
