Canon S820 S820 Quick Start Guide - Page 46
Media Type, Paper Size, Orientation, Automatic, Clipping, Finish, Print, Layout Printing, Tiled
 |
View all Canon S820 manuals
Add to My Manuals
Save this manual to your list of manuals |
Page 46 highlights
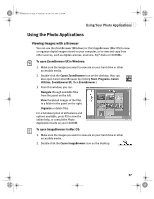
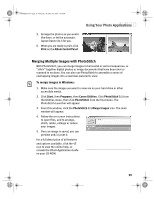
S820QSG.book Page 42 Thursday, October 18, 2001 1:41 PM Using Your Photo Applications 5. Click Next. 6. Specify Media Type, Paper Size and Orientation. The Preview area will show the print image in relation to the paper. 7. Click Set Page Margins to widen or narrow the printing area, then click OK, then Next. 8. Specify the number of photo tiles you want to place in a single page. Select 1 (1 row) when printing a photo with no margins. If you select the Automatic Clipping check box, PhotoRecord automatically resizes and clips the photos to fit the specified photo size. 9. Click Finish. The photo will be automatically positioned to fit the paper settings. Click Print to start printing. In PhotoRecord, page backgrounds and photo frames are not available when using the Borderless Print (Tiled photo) mode. However, you can add text blocks, clip your photos (with some limitations), or specify print quality and number of copies to print. You cannot resize your photos or modify the layout. To print with borderless paper in Mac OS: 1. Follow the procedures above to load the borderless paper on page 41. 2. From ImageBrowser, select the photo to be printed. Locate the Print button along the bottom and click Print. 3. Select Layout Printing. The Layout Options wizard will appear. 4. Select Tiled photo, then click Next. 5. Click Page Setup. The Page Setup dialog box will appear. 6. Click Borderless Printing, then select 4 x 6 under Paper Size and Orientation. Click OK. 7. When the "You selected Borderless Printing" dialog box appears, click OK. 8. Specify the number of images you want to place in a single page. Select 1 (1x1) when printing a photo with no margins. If you select the Automatic Clipping check box, ImageBrowser automatically resizes and clips the photos to fit the specified photo size. 9. Click OK. The photo will be automatically positioned to fit the paper settings. Click Print to start printing. 42
-
 1
1 -
2
-
3
-
4
-
5
-
6
-
7
-
8
-
9
-
10
-
11
-
12
-
13
-
14
-
15
-
16
-
17
-
18
-
19
-
20
-
21
-
22
-
23
-
24
-
25
-
26
-
27
-
28
-
29
-
30
-
31
-
32
-
33
-
34
-
35
-
36
-
37
-
38
-
39
-
40
-
 41
41 -
 42
42 -
 43
43 -
 44
44 -
 45
45 -
 46
46 -
 47
47 -
 48
48 -
 49
49 -
 50
50 -
 51
51 -
52
-
53
-
54
-
55
-
56
-
57
-
58
-
59
-
60
-
61
-
62
-
63
-
64
-
65
-
66
-
67
-
68
-
69
-
70
-
71
-
72
 |
 |
