Canon VIXIA HF G30 Instruction Manual - Page 109
Saving MP4 Movies and Photos Using ImageBrowser EX
 |
View all Canon VIXIA HF G30 manuals
Add to My Manuals
Save this manual to your list of manuals |
Page 109 highlights
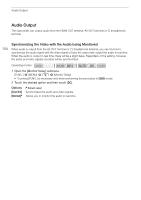
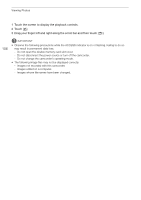
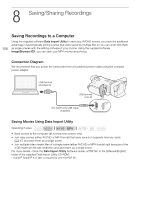
Saving Recordings to a Computer Installing the Software See Installation and System requirements in the Data Import Utility Software Guide (PDF file) for stepby-step installation instructions and full system requirements. Below are the main system requirements. Windows XP1, SP3 Windows Vista2, SP2 OS Windows 72, SP1 Mac OS X 10.6, 10.7 or 10.8 Windows 82 CPU Intel® Core or equivalent Intel® CPU (not compatible with Power PC) RAM 1 GB (2 GB for Windows 7 and 8, 64-bit version and Mac OS X 10.7 and 10.8) Display 1024 x 768 pixels 1 32-bit version only. 2 32-bit and 64-bit versions. 109 IMPORTANT • Before saving scenes to your computer with Data Import Utility using a memory card reader or your computer's memory card slot, do not access or manipulate the files on the memory card with other software. Failing to do so may result in not being able to save the files to your computer. Transferring Movies to the Computer After you install the supplied software Data Import Utility, you can save movies to your computer. 1 Camcorder: Power the camcorder using the compact power adapter. 2 Camcorder: Set the power switch to MEDIA. 3 Camcorder: Open the desired AVCHD movie index screen (A 95). 4 Connect the camcorder to the computer using the supplied USB cable. 5 Camcorder: Touch [All (for PC only)]. 6 Computer: Click the Data Import Utility. icon on the desktop to start 7 Computer: Use Data Import Utility to save the movies onto the computer. • Follow the onscreen instructions and refer to the Data Import Utility Software Guide (PDF file). Saving MP4 Movies and Photos Using ImageBrowser EX With the supplied software ImageBrowser EX you can save MP4 movies and photos to your computer and easily organize them. Refer to the 'ImageBrowser EX Instruction Manual' (PDF file) for the full system requirements and other information. Operating modes:
-
 1
1 -
2
-
3
-
4
-
5
-
6
-
7
-
8
-
9
-
10
-
11
-
12
-
13
-
14
-
15
-
16
-
17
-
18
-
19
-
20
-
21
-
22
-
23
-
24
-
25
-
26
-
27
-
28
-
29
-
30
-
31
-
32
-
33
-
34
-
35
-
36
-
37
-
38
-
39
-
40
-
41
-
42
-
43
-
44
-
45
-
46
-
47
-
48
-
49
-
50
-
51
-
52
-
53
-
54
-
55
-
56
-
57
-
58
-
59
-
60
-
61
-
62
-
63
-
64
-
65
-
66
-
67
-
68
-
69
-
70
-
71
-
72
-
73
-
74
-
75
-
76
-
77
-
78
-
79
-
80
-
81
-
82
-
83
-
84
-
85
-
86
-
87
-
88
-
89
-
90
-
91
-
92
-
93
-
94
-
95
-
96
-
97
-
98
-
99
-
100
-
101
-
102
-
103
-
 104
104 -
 105
105 -
 106
106 -
 107
107 -
 108
108 -
 109
109 -
 110
110 -
 111
111 -
 112
112 -
 113
113 -
 114
114 -
115
-
116
-
117
-
118
-
119
-
120
-
121
-
122
-
123
-
124
-
125
-
126
-
127
-
128
-
129
-
130
-
131
-
132
-
133
-
134
-
135
-
136
-
137
-
138
-
139
-
140
-
141
-
142
-
143
-
144
-
145
-
146
-
147
-
148
-
149
-
150
-
151
-
152
-
153
-
154
-
155
-
156
-
157
-
158
-
159
-
160
-
161
-
162
-
163
-
164
-
165
-
166
-
167
-
168
-
169
-
170
-
171
-
172
-
173
-
174
-
175
-
176
-
177
-
178
-
179
-
180
-
181
-
182
-
183
-
184
-
185
-
186
-
187
-
188
-
189
 |
 |