Canon VIXIA HF M400 VIXIA HF M40 / HF M41 / HF M400 Instruction Manual - Page 130
Playback on a TV Screen
 |
View all Canon VIXIA HF M400 manuals
Add to My Manuals
Save this manual to your list of manuals |
Page 130 highlights
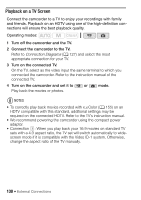
Playback on a TV Screen Connect the camcorder to a TV to enjoy your recordings with family and friends. Playback on an HDTV using one of the high-definition connections will ensure the best playback quality. Operating modes: 1 Turn off the camcorder and the TV. 2 Connect the camcorder to the TV. Refer to Connection Diagrams (0 127) and select the most appropriate connection for your TV. 3 Turn on the connected TV. On the TV, select as the video input the same terminal to which you connected the camcorder. Refer to the instruction manual of the connected TV. 4 Turn on the camcorder and set it to or mode. Play back the movies or photos. NOTES • To correctly play back movies recorded with x.v.Color (0 155) on an HDTV compatible with this standard, additional settings may be required on the connected HDTV. Refer to the TV's instruction manual. • We recommend powering the camcorder using the compact power adapter. • Connection C: When you play back your 16:9 movies on standard TV sets with a 4:3 aspect ratio, the TV set will switch automatically to widescreen mode if it is compatible with the Video ID-1 system. Otherwise, change the aspect ratio of the TV manually. 130 Š External Connections
-
 1
1 -
2
-
3
-
4
-
5
-
6
-
7
-
8
-
9
-
10
-
11
-
12
-
13
-
14
-
15
-
16
-
17
-
18
-
19
-
20
-
21
-
22
-
23
-
24
-
25
-
26
-
27
-
28
-
29
-
30
-
31
-
32
-
33
-
34
-
35
-
36
-
37
-
38
-
39
-
40
-
41
-
42
-
43
-
44
-
45
-
46
-
47
-
48
-
49
-
50
-
51
-
52
-
53
-
54
-
55
-
56
-
57
-
58
-
59
-
60
-
61
-
62
-
63
-
64
-
65
-
66
-
67
-
68
-
69
-
70
-
71
-
72
-
73
-
74
-
75
-
76
-
77
-
78
-
79
-
80
-
81
-
82
-
83
-
84
-
85
-
86
-
87
-
88
-
89
-
90
-
91
-
92
-
93
-
94
-
95
-
96
-
97
-
98
-
99
-
100
-
101
-
102
-
103
-
104
-
105
-
106
-
107
-
108
-
109
-
110
-
111
-
112
-
113
-
114
-
115
-
116
-
117
-
118
-
119
-
120
-
121
-
122
-
123
-
124
-
 125
125 -
 126
126 -
 127
127 -
 128
128 -
 129
129 -
 130
130 -
 131
131 -
 132
132 -
 133
133 -
 134
134 -
 135
135 -
136
-
137
-
138
-
139
-
140
-
141
-
142
-
143
-
144
-
145
-
146
-
147
-
148
-
149
-
150
-
151
-
152
-
153
-
154
-
155
-
156
-
157
-
158
-
159
-
160
-
161
-
162
-
163
-
164
-
165
-
166
-
167
-
168
-
169
-
170
-
171
-
172
-
173
-
174
-
175
-
176
-
177
-
178
-
179
-
180
-
181
-
182
-
183
-
184
-
185
-
186
-
187
-
188
-
189
-
190
-
191
-
192
-
193
-
194
-
195
-
196
-
197
-
198
-
199
-
200
-
201
-
202
-
203
-
204
 |
 |
