Canon VIXIA HF R300 VIXIA HF R30 / HF R32 / HF R300 Instruction Manual - Page 49
Zooming
 |
View all Canon VIXIA HF R300 manuals
Add to My Manuals
Save this manual to your list of manuals |
Page 49 highlights
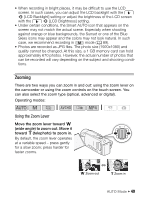
• When recording in bright places, it may be difficult to use the LCD screen. In such cases, you can adjust the LCD backlight with the q > [LCD Backlight] setting or adjust the brightness of the LCD screen with the q > [LCD Brightness] setting. • Under certain conditions, the Smart AUTO icon that appears on the screen may not match the actual scene. Especially when shooting against orange or blue backgrounds, the Sunset or one of the Blue Skies icons may appear and the colors may not look natural. In such case, we recommend recording in mode (A 89). • Photos are recorded as JPG files. The photo size (1920x1080) and quality cannot be changed. At this size, a 1 GB memory card can hold approximately 670 photos. However, the actual number of photos that can be recorded will vary depending on the subject and shooting condi- tions. Zooming There are two ways you can zoom in and out: using the zoom lever on the camcorder or using the zoom controls on the touch screen. You can also select the zoom type (optical, advanced or digital). Operating modes: Using the Zoom Lever Move the zoom lever toward T (wide angle) to zoom out. Move it toward S (telephoto) to zoom in. By default, the zoom lever operates at a variable speed - press gently for a slow zoom; press harder for faster zooms. T Zoom out S Zoom in AUTO Mode Š 49
-
 1
1 -
2
-
3
-
4
-
5
-
6
-
7
-
8
-
9
-
10
-
11
-
12
-
13
-
14
-
15
-
16
-
17
-
18
-
19
-
20
-
21
-
22
-
23
-
24
-
25
-
26
-
27
-
28
-
29
-
30
-
31
-
32
-
33
-
34
-
35
-
36
-
37
-
38
-
39
-
40
-
41
-
42
-
43
-
 44
44 -
 45
45 -
 46
46 -
 47
47 -
 48
48 -
 49
49 -
 50
50 -
 51
51 -
 52
52 -
 53
53 -
 54
54 -
55
-
56
-
57
-
58
-
59
-
60
-
61
-
62
-
63
-
64
-
65
-
66
-
67
-
68
-
69
-
70
-
71
-
72
-
73
-
74
-
75
-
76
-
77
-
78
-
79
-
80
-
81
-
82
-
83
-
84
-
85
-
86
-
87
-
88
-
89
-
90
-
91
-
92
-
93
-
94
-
95
-
96
-
97
-
98
-
99
-
100
-
101
-
102
-
103
-
104
-
105
-
106
-
107
-
108
-
109
-
110
-
111
-
112
-
113
-
114
-
115
-
116
-
117
-
118
-
119
-
120
-
121
-
122
-
123
-
124
-
125
-
126
-
127
-
128
-
129
-
130
-
131
-
132
-
133
-
134
-
135
-
136
-
137
-
138
-
139
-
140
-
141
-
142
-
143
-
144
-
145
-
146
-
147
-
148
-
149
-
150
-
151
-
152
-
153
-
154
-
155
-
156
-
157
-
158
-
159
-
160
-
161
-
162
-
163
-
164
-
165
-
166
-
167
-
168
-
169
-
170
-
171
-
172
-
173
-
174
-
175
-
176
-
177
-
178
-
179
-
180
-
181
-
182
-
183
-
184
-
185
-
186
-
187
-
188
-
189
-
190
-
191
-
192
-
193
-
194
-
195
-
196
-
197
-
198
-
199
-
200
-
201
-
202
-
203
-
204
-
205
-
206
-
207
-
208
-
209
-
210
-
211
-
212
-
213
-
214
-
215
-
216
-
217
-
218
-
219
-
220
-
221
-
222
-
223
-
224
-
225
-
226
 |
 |