Canon XF305 XF300 / XF305 Instruction Manual - Page 135
Adding, Marks or, Marks
 |
View all Canon XF305 manuals
Add to My Manuals
Save this manual to your list of manuals |
Page 135 highlights
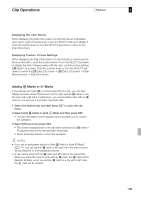
Clip Operations Playback 5 Displaying the User Memo When displaying the [Clip Info] screen of a clip that has an embedded user memo, push the joystick up or turn the SELECT dial up to display it. Push the joystick down or turn the SELECT dial down to return to the [Clip Info] screen. Displaying Custom Picture Settings When displaying the [Clip Info] screen of a clip that has a custom picture file recorded with it, push the joystick down or turn the SELECT dial down to display the first of three screens with the clip's custom picture settings ([X Data 1/3] screen). Push the joystick down or turn the SELECT dial down to switch the [X Data 2/3] screen J [X Data 3/3] screen J [User Memo] screen J [Clip Info] screen. Adding e Marks or Z Marks If you add an OK mark (e) or check mark (Z) to a clip, you can later display an index screen that shows only the clips with an e mark or only the clips with a Z mark. Furthermore, you cannot delete clips with an e mark so you can use it to protect important clips. 1 Select the desired clip and then press SET to open the clip menu. 2 Select [Add e Mark] or [Add Z Mark] and then press SET. • The clip information screen appears and it prompts you to confirm the operation. 3 Select [OK] and then press SET. • The screen changes back to the clip index screen and an e mark or Z appears next to the selected clip's thumbnail. • Select [Cancel] instead to cancel the operation. NOTES • If you set an assignable button to [Add e Mark] or [Add Z Mark] (0 111), you can add an e mark or Z mark from the index screen, during playback or during playback pause. • A clip cannot have both an e mark and Z mark at the same time. When you add a Z mark to a clip with an e mark, the e mark will be deleted. Similarly, when you add an e mark to a clip with a Z mark, the Z mark will be deleted. 135
-
 1
1 -
2
-
3
-
4
-
5
-
6
-
7
-
8
-
9
-
10
-
11
-
12
-
13
-
14
-
15
-
16
-
17
-
18
-
19
-
20
-
21
-
22
-
23
-
24
-
25
-
26
-
27
-
28
-
29
-
30
-
31
-
32
-
33
-
34
-
35
-
36
-
37
-
38
-
39
-
40
-
41
-
42
-
43
-
44
-
45
-
46
-
47
-
48
-
49
-
50
-
51
-
52
-
53
-
54
-
55
-
56
-
57
-
58
-
59
-
60
-
61
-
62
-
63
-
64
-
65
-
66
-
67
-
68
-
69
-
70
-
71
-
72
-
73
-
74
-
75
-
76
-
77
-
78
-
79
-
80
-
81
-
82
-
83
-
84
-
85
-
86
-
87
-
88
-
89
-
90
-
91
-
92
-
93
-
94
-
95
-
96
-
97
-
98
-
99
-
100
-
101
-
102
-
103
-
104
-
105
-
106
-
107
-
108
-
109
-
110
-
111
-
112
-
113
-
114
-
115
-
116
-
117
-
118
-
119
-
120
-
121
-
122
-
123
-
124
-
125
-
126
-
127
-
128
-
129
-
 130
130 -
 131
131 -
 132
132 -
 133
133 -
 134
134 -
 135
135 -
 136
136 -
 137
137 -
 138
138 -
 139
139 -
 140
140 -
141
-
142
-
143
-
144
-
145
-
146
-
147
-
148
-
149
-
150
-
151
-
152
-
153
-
154
-
155
-
156
-
157
-
158
-
159
-
160
-
161
-
162
-
163
-
164
-
165
-
166
-
167
-
168
-
169
-
170
-
171
-
172
-
173
-
174
-
175
-
176
-
177
-
178
-
179
-
180
-
181
-
182
-
183
-
184
-
185
-
186
-
187
-
188
-
189
-
190
-
191
-
192
-
193
-
194
-
195
-
196
-
197
-
198
-
199
-
200
-
201
-
202
-
203
-
204
-
205
-
206
-
207
-
208
 |
 |
