Canon XL-H1 Console Software Operations Manual - Page 34
Preset Variation, Resetting the Custom Preset - hdv camera
 |
UPC - 086753092998
View all Canon XL-H1 manuals
Add to My Manuals
Save this manual to your list of manuals |
Page 34 highlights
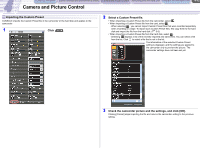
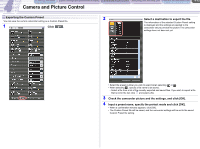
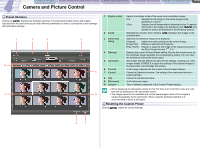
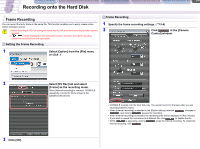
CONSOLE Windows [Option settings] and [Performance check] Camera and Picture Control Recording onto the Hard Disk Playback the Recorded Files Camera and Picture Control 4-14 Preset Variation Clicking on displays the [Variation] window. The [Variation] window shows still images captured from the camcorder picture with different parameters in order to contrast the current settings with alternative settings. 1 2 3 4 10 5 9 6 1 [Display mode] 2 [Level] 3 [Reference] setting 4 [Settings] 5 Candidates 6 [Current] 7 [Cancel] 8 [OK] 9 [Reference] 10 Category Selects the display mode of the current and candidate images. [Fit]: [Clip]: Resizes the still image so the whole image will be displayed in a frame. Displays the still image without adjusting its size. To specify which part in the image to be displayed, click , and specify an area to be displayed in the [Position] window. Specifies the variation level. Clicking specified level. redisplays the images in the Specifies the reference image to be displayed. [Original]: [Image File]: [Play Viewer]: Applies the same settings as the current image. Displays a selected still image file. Displays a captured still image of the displayed picture in the [Play Viewer] window ( 6-1). Displays the current Custom Preset setting. Placing the mouse cursor on the candidate image highlights the corresponding setting. You can close the window by clicking the button again. Still images with the different Custom Preset settings. Clicking one of the images makes CONSOLE to apply the settings of the selected image to the camcorder, and refreshes the window. A still image captured with the current Custom Preset settings. Closes the [Variation] window. The setting of the camcorder returns to original settings. Closes the [Variation] window. A still reference image. Tabs of different categories of the Custom Preset settings. When displaying the [Variation] window for the first time in DV and HDV mode, the color bars will be displayed on the camcorder screen. The images used for the candidate are not the same images. Each of the images is captured separately by the camcorder. When using the [Variation] window, it is recommended to shoot a still object. Resetting the Custom Preset Clicking resets the current settings. 8 7
-
 1
1 -
2
-
3
-
4
-
5
-
6
-
7
-
8
-
9
-
10
-
11
-
12
-
13
-
14
-
15
-
16
-
17
-
18
-
19
-
20
-
21
-
22
-
23
-
24
-
25
-
26
-
27
-
28
-
 29
29 -
 30
30 -
 31
31 -
 32
32 -
 33
33 -
 34
34 -
 35
35 -
 36
36 -
 37
37 -
 38
38 -
 39
39 -
40
-
41
-
42
-
43
-
44
-
45
-
46
-
47
-
48
-
49
-
50
-
51
-
52
-
53
 |
 |
