Canon XL-H1 Console Software Operations Manual - Page 38
Cache Recording - console software
 |
UPC - 086753092998
View all Canon XL-H1 manuals
Add to My Manuals
Save this manual to your list of manuals |
Page 38 highlights
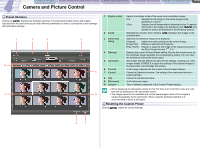
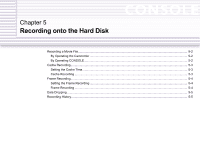
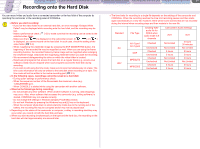
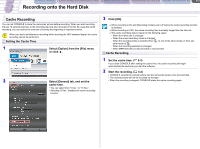
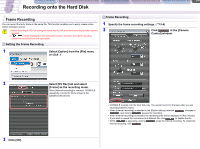
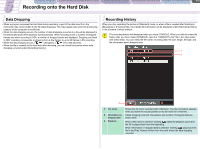
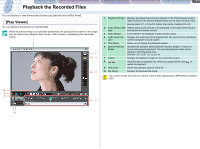
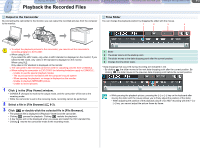
CONSOLE Windows [Option settings] and [Performance check] Camera and Picture Control Recording onto the Hard Disk Playback the Recorded Files 5-3 Recording onto the Hard Disk Cache Recording You can set CONSOLE to store the camcorder picture before recording. When you start recording, the last 10 seconds previous to the recording start are also recorded in the file. By using the cache recording, you can reduce the chances of missing the beginning of important scenes. When you start a simultaneous recording while receiving the HDV standard signal, the cache recording cannot be performed. Setting the Cache Time 1 Select [Option] from the [File] menu or click . 2 Select [General] tab, and set the cache time. • You can select from "0 Sec." to "10 Sec.". • Selecting "0 Sec." disables the cache recording function. 3 Click [OK]. When recording in DV and [Recording mode] is set to [Frame], the cache recording function is disabled. When recording in HDV, the cache recording time is actually longer than the time set. The cache recording data is cleared in the following cases: - When the frame rate is changed. - When the sound recording mode is changed. - When the recording mode is switched from to one of the other modes or from any other mode to . - When the recording standard is changed. - When IEEE1394 (DV) is disconnected or reconnected. Cache Recording 1 Set the cache time. ( 5-3) If you close CONSOLE after setting the cache time, the cache recording will begin automatically the next time you start the software. 2 Start the recording. ( 5-2) • CONSOLE records the cached picture and the camcorder picture onto the hard disk. • The cached picture will not be recorded on the tape. • When the recording is stopped, CONSOLE starts the cache recording again.
-
 1
1 -
2
-
3
-
4
-
5
-
6
-
7
-
8
-
9
-
10
-
11
-
12
-
13
-
14
-
15
-
16
-
17
-
18
-
19
-
20
-
21
-
22
-
23
-
24
-
25
-
26
-
27
-
28
-
29
-
30
-
31
-
32
-
 33
33 -
 34
34 -
 35
35 -
 36
36 -
 37
37 -
 38
38 -
 39
39 -
 40
40 -
 41
41 -
 42
42 -
 43
43 -
44
-
45
-
46
-
47
-
48
-
49
-
50
-
51
-
52
-
53
 |
 |