Canon XL-H1 Console Software Operations Manual - Page 42
Play Viewer]
 |
UPC - 086753092998
View all Canon XL-H1 manuals
Add to My Manuals
Save this manual to your list of manuals |
Page 42 highlights
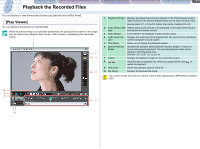
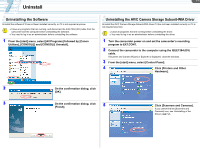
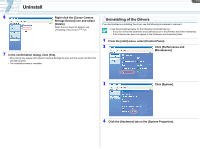
CONSOLE Windows [Option settings] and [Performance check] Camera and Picture Control Recording onto the Hard Disk Playback the Recorded Files 6-1 Playback the Recorded Files You can playback or view the recorded pictures using playback tools in [Play Panel]. [Play Viewer] You can playback and preview the recorded files. When the preview image is not smoothly played back, the playing back condition of the image may be improved by hiding the [Rec Panel] or [Rec Viewer], not displaying the camcorder picture. 1 2 3 4 1 Playback Preview Displays the played back pictures selected in the [File Browser] window. Right clicking on the preview window allows you to select the size of the preview panel ( 4-1) and to display the overlay markers ( 4-2). 2 Audio Monitor Set- Selects which audio channel to be displayed on the audio level indicator tings and adjusts the monitor volume. 3 Audio Monitor Turns ON/OFF the computer's audio monitor output. 4 Audio Level Indi- Displays the audio level of the playback file.The sound can be monitored cator with the computer's sound system. 5 Time Slider Allows you to change the playback position. 6 Special Playback Specifies the playback speed (Special Playback Modes). There is no Modes sound during special playback. The special playback modes can be applied to fast-forwarding only. DV/HDV: 1/3, 1/2.5, 1/2, 1x, 2x, 4x 7 Output Displays the playback images on the camcorder screen. 8 / Plays/Pauses the playback file. When you pause the file, click to restart the playback. 9 Time Code Shows the playback position of the file. 10 File Name Displays the playback file name. You cannot monitor the sound on channel 3 and 4 when playing back a MPEG2ES recorded in HDV. 10 9 8 5 76
-
 1
1 -
2
-
3
-
4
-
5
-
6
-
7
-
8
-
9
-
10
-
11
-
12
-
13
-
14
-
15
-
16
-
17
-
18
-
19
-
20
-
21
-
22
-
23
-
24
-
25
-
26
-
27
-
28
-
29
-
30
-
31
-
32
-
33
-
34
-
35
-
36
-
 37
37 -
 38
38 -
 39
39 -
 40
40 -
 41
41 -
 42
42 -
 43
43 -
 44
44 -
 45
45 -
 46
46 -
 47
47 -
48
-
49
-
50
-
51
-
52
-
53
 |
 |
