Canon XL-H1 Console Software Operations Manual - Page 36
Option settings] and [Performance check], Camera and Picture Control, Recording onto the Hard Disk, - viewfinder
 |
UPC - 086753092998
View all Canon XL-H1 manuals
Add to My Manuals
Save this manual to your list of manuals |
Page 36 highlights
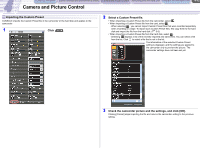
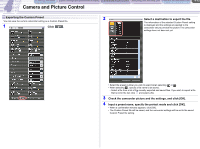
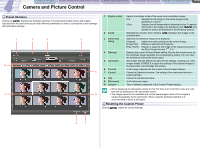
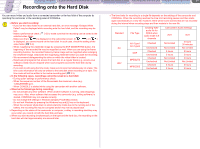
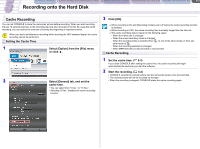
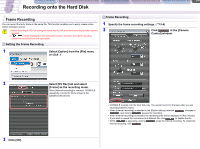
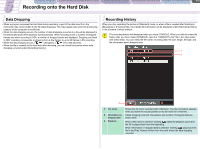
CONSOLE Windows [Option settings] and [Performance check] Camera and Picture Control Recording onto the Hard Disk Playback the Recorded Files 5-1 Recording onto the Hard Disk You can record video and audio from a connected camcorder on the hard disk of the computer by operating the camcorder or the recording panel of CONSOLE. Before you start recording: - If you set the video folder to an external hard disk, an error message "Delayed Write Failed" may be displayed while recording onto the hard disk, and the recording may be lost. - Make a performance check ( 3-3) to make sure that the recording can be saved to the selected video folder. - Make sure that [ ] is displayed on the camcorder screen. If [ ] or [ ] is displayed, you cannot record on the hard disk. In such case, check the setting of the video folder ( Tr-2). - When magnifying the viewfinder image by pressing the EVF MAGNIFYING button, the beginning of the recorded file may be magnified as well. When you are using the frame recording function, the recorded frame-by-frame image will be magnified when enlarging the viewfinder image. Deactivate the magnifying viewfinder before you start the recording. - We recommend defragmenting the drive on which the video folder is located. - Deactivate all programs that access the hard disk on a regular basis (e.g. as anti-virus software). Data may be dropped when such programs access the hard disk during recording. - If you wish to edit using the time code, make sure to record simultaneously on a tape. The time code information will only be written to the hard disk when recording on a tape. The time code will not be written in the cache recording part ( 5-3). In the following cases, recordings cannot be saved on a hard disk: - During option settings or performance check. - When the sequence number of the file exceeds the maximum value (e.g. "CNSL9999999.avi"). - When CONSOLE is started while using the camcorder with another software. Observe the followings during recording: - Do not activate any other software. When another software is running, data droppings may occur. Also, when software that accesses the camcorder (e.g. editing software) is started, CONSOLE may not operate correctly. - Do not change the settings in Windows [Display Properties] window. - Do not lock Windows by pressing the Windows key and [L] key on the keyboard. - When the computer shuts down or enters stand-by mode due to the running out of the battery, the recording file may be corrupted and/or may not be played back. Depending on the status of the camcorder or computer, a delay in recording start/stop may occur when you record on both the hard disk and tape. When you start recording simultaneously on the tape and the hard disc, the recording on the hard disc will start approximately one second later. The time limits for recording to a single file depends on the settings of the camcorder and CONSOLE. When the recording reaches the time limit recording pauses and then starts again automatically in a new file. However, there will be some scenes that are not recorded during the interval when recording stops and then restarts in the new file. Standard DV HDV File Type AVI-Type1 AVI-Type2 MXF MPEG2TS MPEG2ES Creating WAV audio file for CH3/4 when audio mode is 4 channels Checked Unchecked Checked Unchecked Checked Unchecked Checked Unchecked Camcorder's Audio Settings 2CH 4CH Not Limited Not Limited 3 hours 3 hours Not Limited Not Limited 3 hours 3 hours 4 hours 30 minutes Not Limited 3 hours 3 hours 3 hours Not Limited 3 hours 3 hours
-
 1
1 -
2
-
3
-
4
-
5
-
6
-
7
-
8
-
9
-
10
-
11
-
12
-
13
-
14
-
15
-
16
-
17
-
18
-
19
-
20
-
21
-
22
-
23
-
24
-
25
-
26
-
27
-
28
-
29
-
30
-
 31
31 -
 32
32 -
 33
33 -
 34
34 -
 35
35 -
 36
36 -
 37
37 -
 38
38 -
 39
39 -
 40
40 -
 41
41 -
42
-
43
-
44
-
45
-
46
-
47
-
48
-
49
-
50
-
51
-
52
-
53
 |
 |