Canon i475D i475D Direct Printing Guide - Page 22
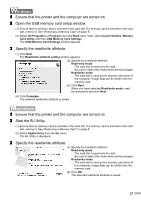
Ensure that the printer and the computer are turned on., Open the USB memory card setup window.,
 |
View all Canon i475D manuals
Add to My Manuals
Save this manual to your list of manuals |
Page 22 highlights
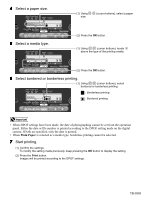
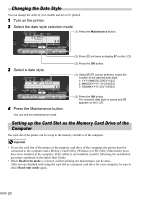
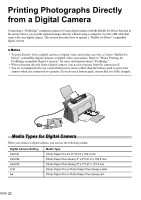
W 1 Ensure that the printer and the computer are turned on. 2 Open the USB memory card setup window. (1) Ensure that no memory card is inserted in the card slot. If a memory card is inserted in the card slot, remove it. See "Removing a Memory Card" on page 8. (2) Select All Programs (or Program) from the Start menu. Next, select Canon Utilities, Memory Card Utility, and then USB Memory Card Settings. The USB Memory Card Settings window appears. 3 Specify the read/write attribute. (1) Click Next. The Read/write attribute setting window appears. (2) Specify the read/write attribute. Read-only mode ... The card slot is used only for read. Be sure to select this mode when printing images. Read/write mode ... The card slot is used as the memory card drive of the computer. Image data can be written into the memory card. (3) Click Next. When you have selected Read/write mode, read the precaution and click Next. (4) Click Complete. The selected read/write attribute is saved. 1 Ensure that the printer and the computer are turned on. 2 Start the BJ Utility. (1) Ensure that no memory card is inserted in the card slot. If a memory card is inserted in the card slot, remove it. See "Removing a Memory Card" on page 8. (2) Select Applications from the Go menu. The BJ Utility is displayed. 3 Specify the read/write attribute. (1) Specify the read/write attribute. Read-only mode ... The card slot is used only for read. Be sure to select this mode when printing images. Read/write mode ... The card slot is used as the memory card drive of the computer. Image data can be written into the memory card. (2) Click OK. The selected read/write attribute is saved. 21
-
 1
1 -
2
-
3
-
4
-
5
-
6
-
7
-
8
-
9
-
10
-
11
-
12
-
13
-
14
-
15
-
16
-
 17
17 -
 18
18 -
 19
19 -
 20
20 -
 21
21 -
 22
22 -
 23
23 -
 24
24 -
 25
25 -
 26
26 -
 27
27 -
28
-
29
-
30
-
31
-
32
-
33
-
34
-
35
-
36
-
37
-
38
-
39
-
40
-
41
 |
 |
