Canon i475D i475D Direct Printing Guide - Page 27
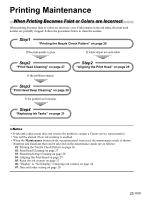
Printing the Nozzle Check Pattern, Examining the Nozzle Check Pattern
 |
View all Canon i475D manuals
Add to My Manuals
Save this manual to your list of manuals |
Page 27 highlights
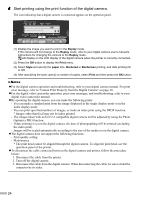
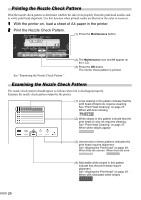
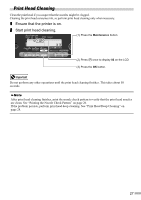
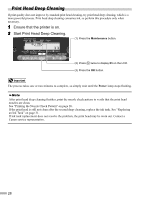
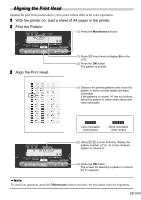
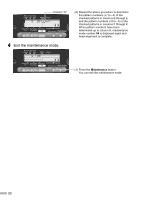
Printing the Nozzle Check Pattern Print the nozzle check pattern to determine whether the ink ejects properly from the print head nozzles and to verify print head alignment. Use this function when printed results are blurred or the color is incorrect. 1 With the printer on, load a sheet of A4 paper in the printer. 2 Print the Nozzle Check Pattern. (1) Press the Maintenance button. See "Examining the Nozzle Check Pattern." (2) The Maintenance icon and 01 appear on the LCD. (3) Press the OK button. The nozzle check pattern is printed. Examining the Nozzle Check Pattern The nozzle check pattern should appear as follows when ink is discharged properly. Examine the nozzle check pattern output by the printer. (1) Lines missing in this pattern indicate that the print head of black ink requires cleaning. See "Print Head Cleaning" on page 27. When with lines missing (2) White stripes in this pattern indicate that the print head of color ink requires cleaning. See "Print Head Cleaning" on page 27. When white stripes appear (3) Unevenness in these patterns indicates the print head requires alignment. See "Aligning the Print Head" on page 29. When lines are uneven When lines are even (4) Noticeable white stripes in this pattern indicate that the print heads require alignment. See "Aligning the Print Head" on page 29. When with noticeable white stripes 26
-
 1
1 -
2
-
3
-
4
-
5
-
6
-
7
-
8
-
9
-
10
-
11
-
12
-
13
-
14
-
15
-
16
-
17
-
18
-
19
-
20
-
21
-
 22
22 -
 23
23 -
 24
24 -
 25
25 -
 26
26 -
 27
27 -
 28
28 -
 29
29 -
 30
30 -
 31
31 -
 32
32 -
33
-
34
-
35
-
36
-
37
-
38
-
39
-
40
-
41
 |
 |
