Canon imageCLASS D1150 imageCLASS D1180/D1170/D1150/D1120 Basic Operation Guid - Page 273
Machine Settings, Printing USER DATA LIST, Accessing the Setting Menu, Stop/Reset]
 |
View all Canon imageCLASS D1150 manuals
Add to My Manuals
Save this manual to your list of manuals |
Page 273 highlights
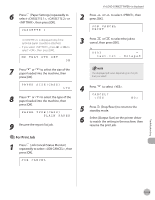
Machine Settings Machine Settings You can adjust the machine settings from the Setting Menu to customize the way the machine works. To see the list of the current settings, print out USER DATA LIST. Printing USER DATA LIST To print USER DATA LIST, follow the procedure below. 1 Press [Report] repeatedly to select , then press [OK]. USER DATA LIST 2 Press to select . OK TO PRINT? < YES NO > Printing starts, and the screen automatically returns to the standby mode. Accessing the Setting Menu To access the setting menu, follow the procedure below. 1 Press [Menu]. 2 Press or to select the menu you want to access, then press [OK]. MENU 1.VOLUME CONTROL 13-2 - - - - - - - - - - These menus are based on the D1180. 3 Press or to select a submenu, then press [OK]. VOLUME CONTROL 1.MONITOR VOLUME For details on the submenu, see "Setting Menu," on p. 13-3. 4 To register the settings or go to a submenu item, press [OK]. 5 When finished, press [Stop/Reset] to return to the standby mode. - If you press [Stop/Reset] before pressing [OK], the setting will not be registered. - Press [Menu] to return to the previous display. Machine Settings
-
 1
1 -
2
-
3
-
4
-
5
-
6
-
7
-
8
-
9
-
10
-
11
-
12
-
13
-
14
-
15
-
16
-
17
-
18
-
19
-
20
-
21
-
22
-
23
-
24
-
25
-
26
-
27
-
28
-
29
-
30
-
31
-
32
-
33
-
34
-
35
-
36
-
37
-
38
-
39
-
40
-
41
-
42
-
43
-
44
-
45
-
46
-
47
-
48
-
49
-
50
-
51
-
52
-
53
-
54
-
55
-
56
-
57
-
58
-
59
-
60
-
61
-
62
-
63
-
64
-
65
-
66
-
67
-
68
-
69
-
70
-
71
-
72
-
73
-
74
-
75
-
76
-
77
-
78
-
79
-
80
-
81
-
82
-
83
-
84
-
85
-
86
-
87
-
88
-
89
-
90
-
91
-
92
-
93
-
94
-
95
-
96
-
97
-
98
-
99
-
100
-
101
-
102
-
103
-
104
-
105
-
106
-
107
-
108
-
109
-
110
-
111
-
112
-
113
-
114
-
115
-
116
-
117
-
118
-
119
-
120
-
121
-
122
-
123
-
124
-
125
-
126
-
127
-
128
-
129
-
130
-
131
-
132
-
133
-
134
-
135
-
136
-
137
-
138
-
139
-
140
-
141
-
142
-
143
-
144
-
145
-
146
-
147
-
148
-
149
-
150
-
151
-
152
-
153
-
154
-
155
-
156
-
157
-
158
-
159
-
160
-
161
-
162
-
163
-
164
-
165
-
166
-
167
-
168
-
169
-
170
-
171
-
172
-
173
-
174
-
175
-
176
-
177
-
178
-
179
-
180
-
181
-
182
-
183
-
184
-
185
-
186
-
187
-
188
-
189
-
190
-
191
-
192
-
193
-
194
-
195
-
196
-
197
-
198
-
199
-
200
-
201
-
202
-
203
-
204
-
205
-
206
-
207
-
208
-
209
-
210
-
211
-
212
-
213
-
214
-
215
-
216
-
217
-
218
-
219
-
220
-
221
-
222
-
223
-
224
-
225
-
226
-
227
-
228
-
229
-
230
-
231
-
232
-
233
-
234
-
235
-
236
-
237
-
238
-
239
-
240
-
241
-
242
-
243
-
244
-
245
-
246
-
247
-
248
-
249
-
250
-
251
-
252
-
253
-
254
-
255
-
256
-
257
-
258
-
259
-
260
-
261
-
262
-
263
-
264
-
265
-
266
-
267
-
 268
268 -
 269
269 -
 270
270 -
 271
271 -
 272
272 -
 273
273 -
 274
274 -
 275
275 -
 276
276 -
 277
277 -
 278
278 -
279
-
280
-
281
-
282
-
283
-
284
-
285
-
286
-
287
-
288
-
289
-
290
-
291
-
292
-
293
-
294
-
295
-
296
-
297
-
298
-
299
-
300
-
301
-
302
-
303
-
304
-
305
 |
 |
