Canon imageCLASS D1150 imageCLASS D1180/D1170/D1150/D1120 Basic Operation Guid - Page 46
Setting the Auto Clear Time, Setting the Daylight Saving Time
 |
View all Canon imageCLASS D1150 manuals
Add to My Manuals
Save this manual to your list of manuals |
Page 46 highlights
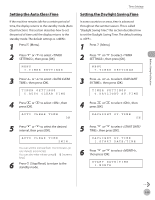
Before Using the Machine Setting the Auto Clear Time If the machine remains idle for a certain period of time, the display returns to the standby mode (Auto Clear function). This section describes how to set the period of time until the display returns to the standby mode. The default settings is . 1 Press [Menu]. 2 Press or to select , then press [OK]. MENU 7.TIMER SETTINGS 3 Press or to select , then press [OK]. TIMER SETTINGS 5.AUTO CLEAR TIME 4 Press or press [OK]. to select , then AUTO CLEAR TIME ON 5 Press or to select the desired interval, then press [OK]. AUTO CLEAR TIME 2MIN. You can set the interval from 1 to 9 minutes (in one minute increments). You can also enter values using - [numeric keys]. 6 Press [Stop/Reset] to return to the standby mode. Timer Settings Setting the Daylight Saving Time In some countries or areas, time is advanced throughout the summer season. This is called "Daylight Saving Time." This section describes how to set the Daylight Saving Time. The default setting is . 1 Press [Menu]. 2 Press or to select , then press [OK]. MENU 7.TIMER SETTINGS 3 Press or to select , then press [OK]. TIMER SETTINGS 6.DAYLIGHT SV.TIME 4 Press or to select , then press [OK]. DAYLIGHT SV.TIME ON 5 Press or to select , then press [OK]. DAYLIGHT SV.TIME 1.START DATE/TIME 6 Press or to select , then press [OK]. START DATE/TIME 1.MONTH 1-19
-
 1
1 -
2
-
3
-
4
-
5
-
6
-
7
-
8
-
9
-
10
-
11
-
12
-
13
-
14
-
15
-
16
-
17
-
18
-
19
-
20
-
21
-
22
-
23
-
24
-
25
-
26
-
27
-
28
-
29
-
30
-
31
-
32
-
33
-
34
-
35
-
36
-
37
-
38
-
39
-
40
-
 41
41 -
 42
42 -
 43
43 -
 44
44 -
 45
45 -
 46
46 -
 47
47 -
 48
48 -
 49
49 -
 50
50 -
 51
51 -
52
-
53
-
54
-
55
-
56
-
57
-
58
-
59
-
60
-
61
-
62
-
63
-
64
-
65
-
66
-
67
-
68
-
69
-
70
-
71
-
72
-
73
-
74
-
75
-
76
-
77
-
78
-
79
-
80
-
81
-
82
-
83
-
84
-
85
-
86
-
87
-
88
-
89
-
90
-
91
-
92
-
93
-
94
-
95
-
96
-
97
-
98
-
99
-
100
-
101
-
102
-
103
-
104
-
105
-
106
-
107
-
108
-
109
-
110
-
111
-
112
-
113
-
114
-
115
-
116
-
117
-
118
-
119
-
120
-
121
-
122
-
123
-
124
-
125
-
126
-
127
-
128
-
129
-
130
-
131
-
132
-
133
-
134
-
135
-
136
-
137
-
138
-
139
-
140
-
141
-
142
-
143
-
144
-
145
-
146
-
147
-
148
-
149
-
150
-
151
-
152
-
153
-
154
-
155
-
156
-
157
-
158
-
159
-
160
-
161
-
162
-
163
-
164
-
165
-
166
-
167
-
168
-
169
-
170
-
171
-
172
-
173
-
174
-
175
-
176
-
177
-
178
-
179
-
180
-
181
-
182
-
183
-
184
-
185
-
186
-
187
-
188
-
189
-
190
-
191
-
192
-
193
-
194
-
195
-
196
-
197
-
198
-
199
-
200
-
201
-
202
-
203
-
204
-
205
-
206
-
207
-
208
-
209
-
210
-
211
-
212
-
213
-
214
-
215
-
216
-
217
-
218
-
219
-
220
-
221
-
222
-
223
-
224
-
225
-
226
-
227
-
228
-
229
-
230
-
231
-
232
-
233
-
234
-
235
-
236
-
237
-
238
-
239
-
240
-
241
-
242
-
243
-
244
-
245
-
246
-
247
-
248
-
249
-
250
-
251
-
252
-
253
-
254
-
255
-
256
-
257
-
258
-
259
-
260
-
261
-
262
-
263
-
264
-
265
-
266
-
267
-
268
-
269
-
270
-
271
-
272
-
273
-
274
-
275
-
276
-
277
-
278
-
279
-
280
-
281
-
282
-
283
-
284
-
285
-
286
-
287
-
288
-
289
-
290
-
291
-
292
-
293
-
294
-
295
-
296
-
297
-
298
-
299
-
300
-
301
-
302
-
303
-
304
-
305
 |
 |
