Chamberlain B2210T Installation Manual - English Spanish - Page 21
STEP 8 Install the Door Bracket continued, OPTION B- ONE-PIECE DOORS
 |
View all Chamberlain B2210T manuals
Add to My Manuals
Save this manual to your list of manuals |
Page 21 highlights
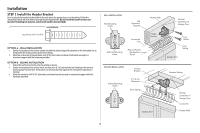
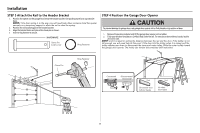
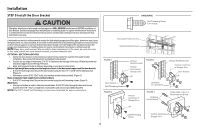
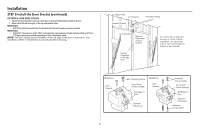
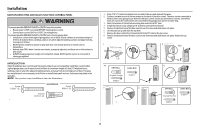
Installation STEP 8 Install the Door Bracket (continued) OPTION B- ONE-PIECE DOORS 1. Center the door bracket on the top of the door, in line with the header bracket as shown. 2. Mark either the left and right, or the top and bottom holes. Metal Doors: l Drill 3/16" pilot holes and fasten the bracket with the self-threading screws provided. Wood Doors: l Drill 5/16" holes and use 5/16"-18x2" carriage bolts, lock washers and nuts (not provided) or 5/16"x1- 1/2"lag screws (not provided) depending on your installation needs. NOTE: The door bracket may be installed on the top edge of the door if required for your installation. (Refer to thedotted line optional placement drawing.) Header Wall 2x4 Support Header Bracket (Finished Ceiling) Door Bracket Optional Placement of Door Bracket Vertical Centerline of Garage Door For a door with no exposed framing, or for the optional installation, use lag screws 5/16"x1-1/2" (not provided) to fasten the door bracket. Metal Door Door Bracket Self-Threading Screw Top of Door (Inside Garage) Wood Door Door Bracket Top Edge of Door Optional Placement Hardware (not provided) Top of Door (Inside Garage) Top Edge of Door Optional Placement Hardware (not provided) 21
-
 1
1 -
2
-
3
-
4
-
5
-
6
-
7
-
8
-
9
-
10
-
11
-
12
-
13
-
14
-
15
-
 16
16 -
 17
17 -
 18
18 -
 19
19 -
 20
20 -
 21
21 -
 22
22 -
 23
23 -
 24
24 -
 25
25 -
 26
26 -
27
-
28
-
29
-
30
-
31
-
32
-
33
-
34
-
35
-
36
-
37
-
38
-
39
-
40
-
41
-
42
-
43
-
44
-
45
-
46
-
47
-
48
-
49
-
50
-
51
-
52
-
53
-
54
-
55
-
56
-
57
-
58
-
59
-
60
-
61
-
62
-
63
-
64
-
65
-
66
-
67
-
68
-
69
-
70
-
71
-
72
-
73
-
74
-
75
-
76
-
77
-
78
-
79
-
80
-
81
-
82
-
83
-
84
-
85
-
86
-
87
-
88
-
89
-
90
-
91
-
92
-
93
-
94
-
95
-
96
-
97
-
98
-
99
-
100
-
101
-
102
-
103
-
104
 |
 |
