Cisco WVC210 Administration Guide - Page 42
Setup > Basic Settings, Device Settings - manual
 |
UPC - 745883584703
View all Cisco WVC210 manuals
Add to My Manuals
Save this manual to your list of manuals |
Page 42 highlights
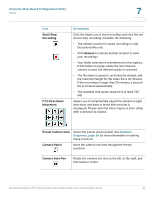
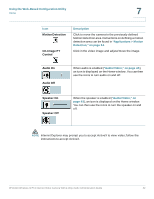
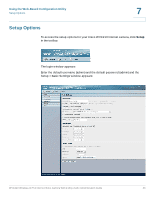
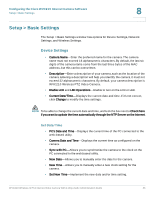
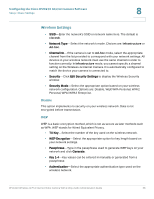
Configuring the Cisco WVC210 Internet Camera Software Setup > Basic Settings 8 Setup > Basic Settings The Setup > Basic Settings window has options for Device Settings, Network Settings, and Wireless Settings. Device Settings • Camera Name-Enter the preferred name for the camera. The camera name must not exceed 16 alphanumeric characters. By default, the last six digits of the camera name come from the last three bytes of the MAC address, but this can be overwritten. • Description-Enter a description of your camera, such as the location of the camera. Entering a description will help you identify the camera. It must not exceed 32 alphanumeric characters. By default, your camera description is WVC210 Wireless PTZ Video Camera. • Enable LCD and LED Operations-Enable to turn on the LCD or LED. • Current Date/Time-Displays the current date and time. If it's not correct, click Change to modify the time settings. NOTE To be able to change the current date and time, uncheck the box next to Check here if you want to update the time automatically through the NTP Server on the Internet. Set Date/Time • PC's Date and Time-Displays the current time of the PC connected to the web-based utility. • Camera Date and Time-Displays the current time as configured on the camera. • Sync with PC-Allows you to synchronize the camera to the clock on the PC connected to the web.based utility. • New Date-Allows you to manually enter the date for the camera. • New Time-Allows you to manually enter a new clock setting for the camera. • Set New Time-Implement the new date and/or time setting. WVC210 Wireless-G PTZ Internet Video Camera With 2-Way Audio Administration Guide 36
-
 1
1 -
2
-
3
-
4
-
5
-
6
-
7
-
8
-
9
-
10
-
11
-
12
-
13
-
14
-
15
-
16
-
17
-
18
-
19
-
20
-
21
-
22
-
23
-
24
-
25
-
26
-
27
-
28
-
29
-
30
-
31
-
32
-
33
-
34
-
35
-
36
-
 37
37 -
 38
38 -
 39
39 -
 40
40 -
 41
41 -
 42
42 -
 43
43 -
 44
44 -
 45
45 -
 46
46 -
 47
47 -
48
-
49
-
50
-
51
-
52
-
53
-
54
-
55
-
56
-
57
-
58
-
59
-
60
-
61
-
62
-
63
-
64
-
65
-
66
-
67
-
68
-
69
-
70
-
71
-
72
-
73
-
74
-
75
-
76
-
77
-
78
-
79
-
80
-
81
-
82
-
83
-
84
-
85
 |
 |